

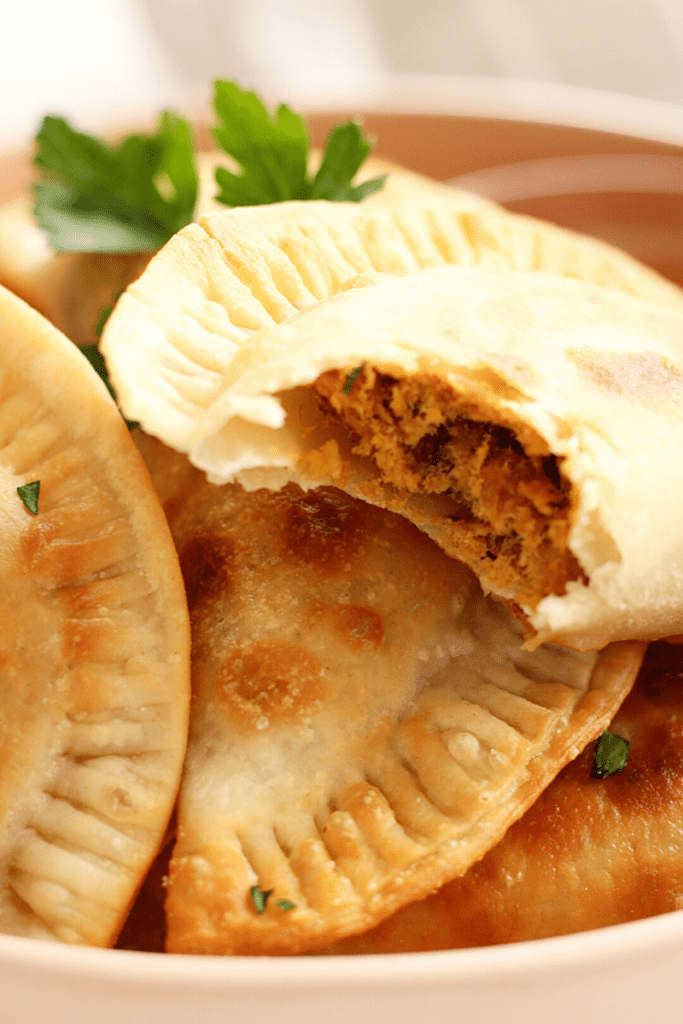
Rissois de atum are crescent-shaped pastries that are filled with creamy tuna filling, dipped in bread crumbs and fried until golden brown. Rissois make the perfect snack or appetizer!
Have you tried my recipe for shrimp rissois? The sweet and creamy shrimp-filling melts right in your mouth! Same delicious outer shell!

What are rissois?
‘Rissois‘ is Portuguese for ‘rissoles‘, which are breaded, deep-fried pastries with creamy seafood in the center. This version of rissois originated in Portugal but has also become a part of Cape Verdean cuisine.
Portuguese rissois differ from other ‘rissoles’ eaten in England, Australia and France. The non-Portuguese versions are usually made from minced meat and some versions leave out the pastry shell and are just rolled in breadcrumbs.
Why you’ll love this recipe
These rissois have a creamy, zesty, tuna filling and an outer shell-pastry that’s crispy, yet still delicate. We Cape Verdeans love our tuna, so to me this version is a classic!
I love serving rissois because you can keep them in a warm oven before you’re ready to serve them, or you can fry them up very quickly right before serving! They hold up very well when kept warm or when reheated.
And yes, this recipe has a lot of steps, but it’s easy to develop a rhythm once you get started!
Commonly asked questions
Pateis (pastel is singular) are another tuna-filled pastry that are similar to empanadas. Check out this recipe for pastel.
The pastry itself is light and flaky, unlike rissois which is more dense and dipped in bread crumbs. Rissois filling is creamy where pastel filling is more dry and flaky.
Croquettes are yet-another fried pastry that resemble rissois! They’re usually made from combination of fish (tuna or cod) and mashed potatoes.
They’re rolled into a ball or log shape, dipped in bread crumbs, then deep fried.

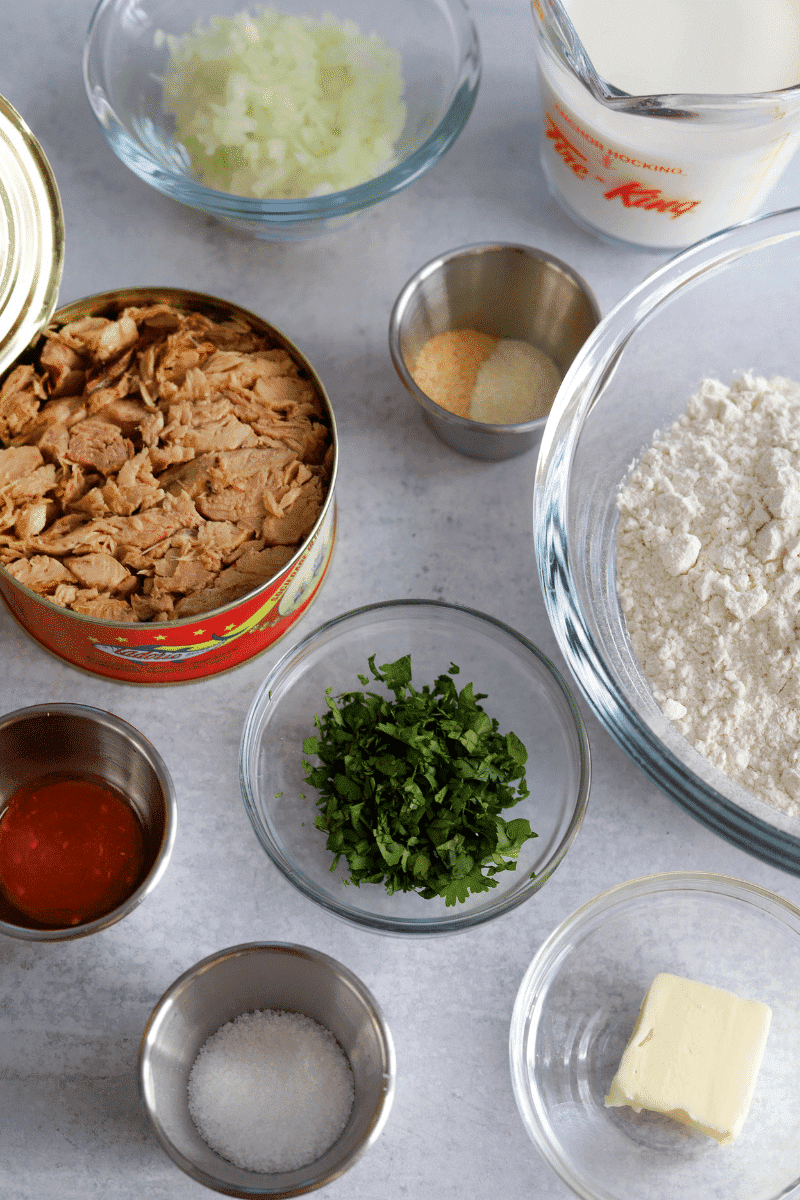
Ingredients you’ll need
Here’s a list of all the ingredients. Refer to the recipe card below for measurements and quantities.
- Canned tuna – tuna packed in oil is recommended because oil preserves the flavor of the tuna. Imported tuna from Cape Verde or Portugal works best but you can use regular canned tuna.
- Other filling ingredients – diced onions, crushed garlic, massa de pimentão (crushed red chilis) or hot sauce, heavy cream, flour, fresh cilantro, onion powder, garlic powder, salt and pepper
- Dough ingredients – unsalted butter, olive oil, all-purpose flour, water and salt
- Egg wash: 2 eggs + 2 teaspoons of water
- Bread crumbs – Seasoned or Italian style
- Canola or vegetable oil for frying
How to make rissois de atum:
Prepare the filling
- Whisk together the flour and heavy cream in a small bowl or measuring cup. Set the mixture aside.
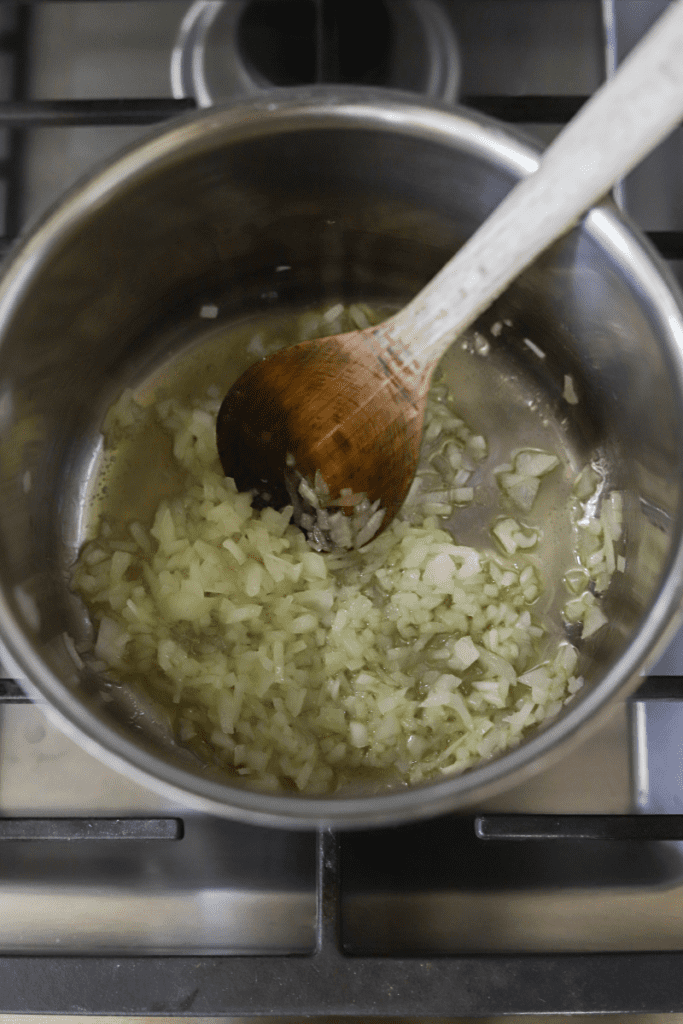
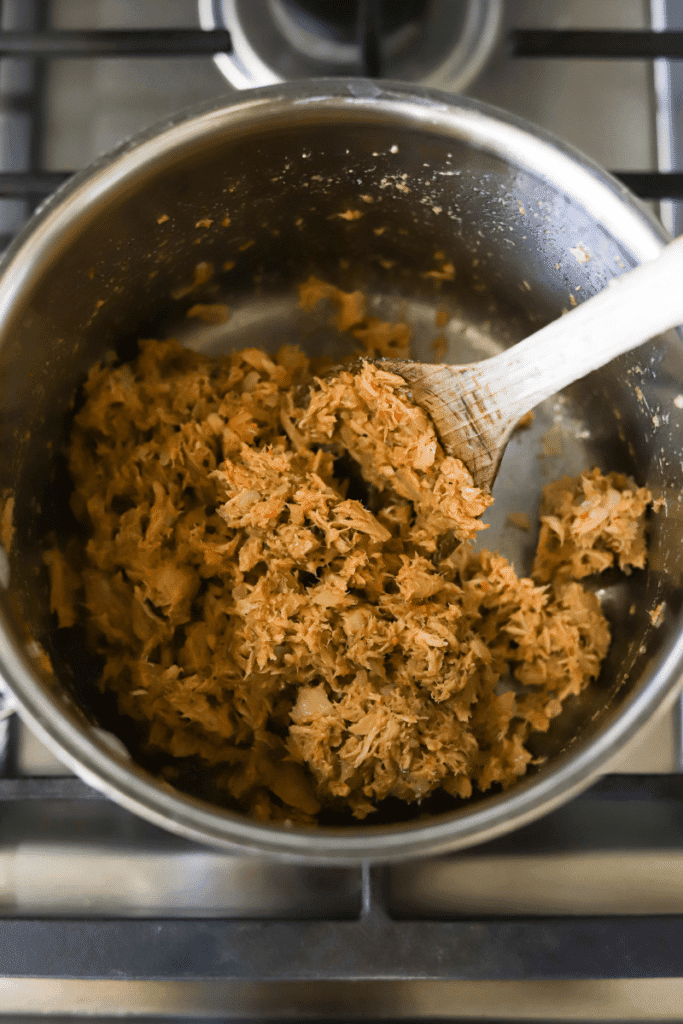
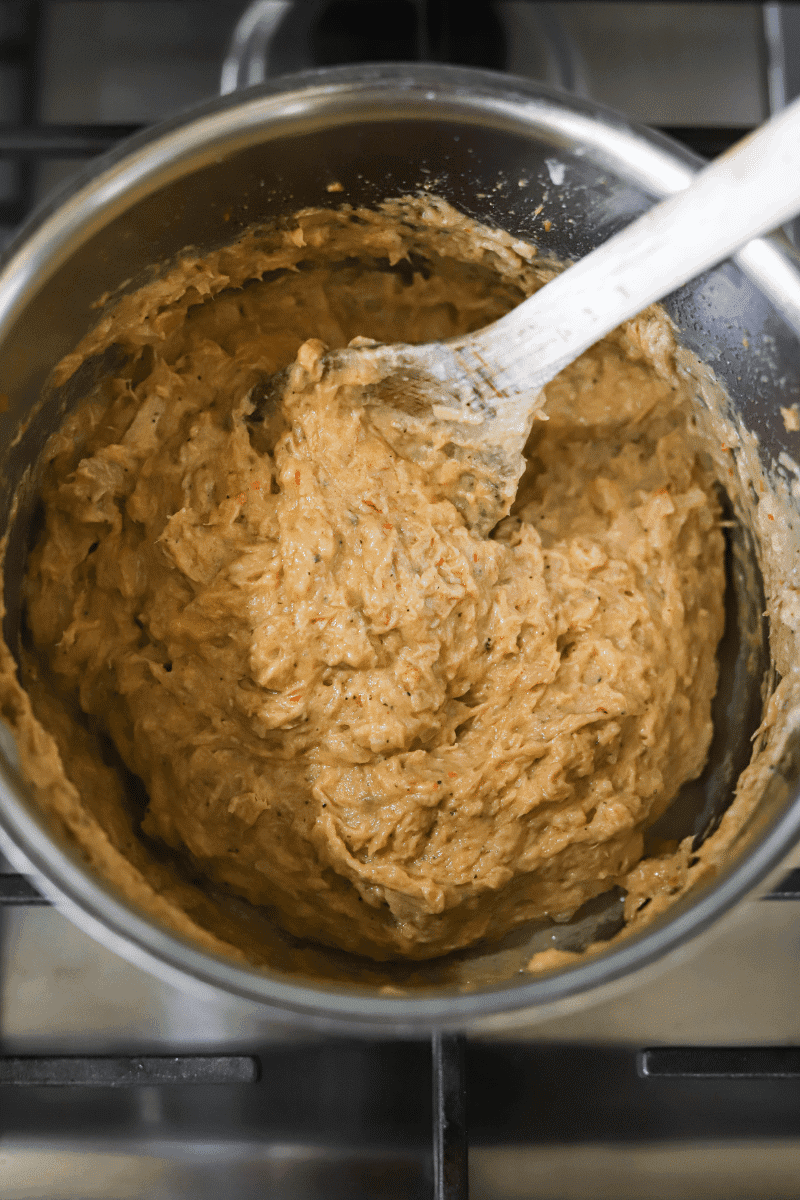
- Heat the olive oil in a 3-quart saucepan. Add the onions and cook them until they’re translucent. Add the crushed garlic, hot sauce, tuna and dry seasonings. Cook until fragrant.
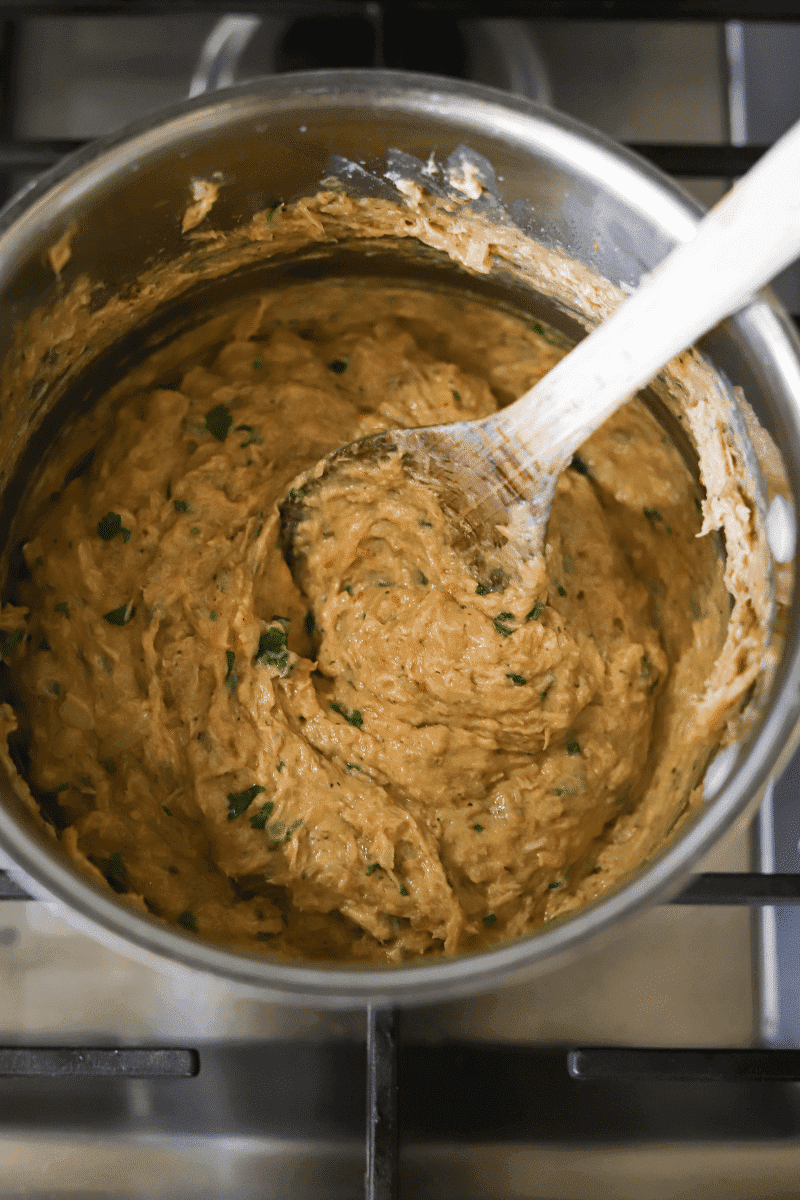
- Add the heavy cream/flour mixture and cook for 3-5 minutes, stirring until it’s bubbly and thick. Cut the flame, stir in the fresh cilantro, then cover the pan and set aside.
Make the dough
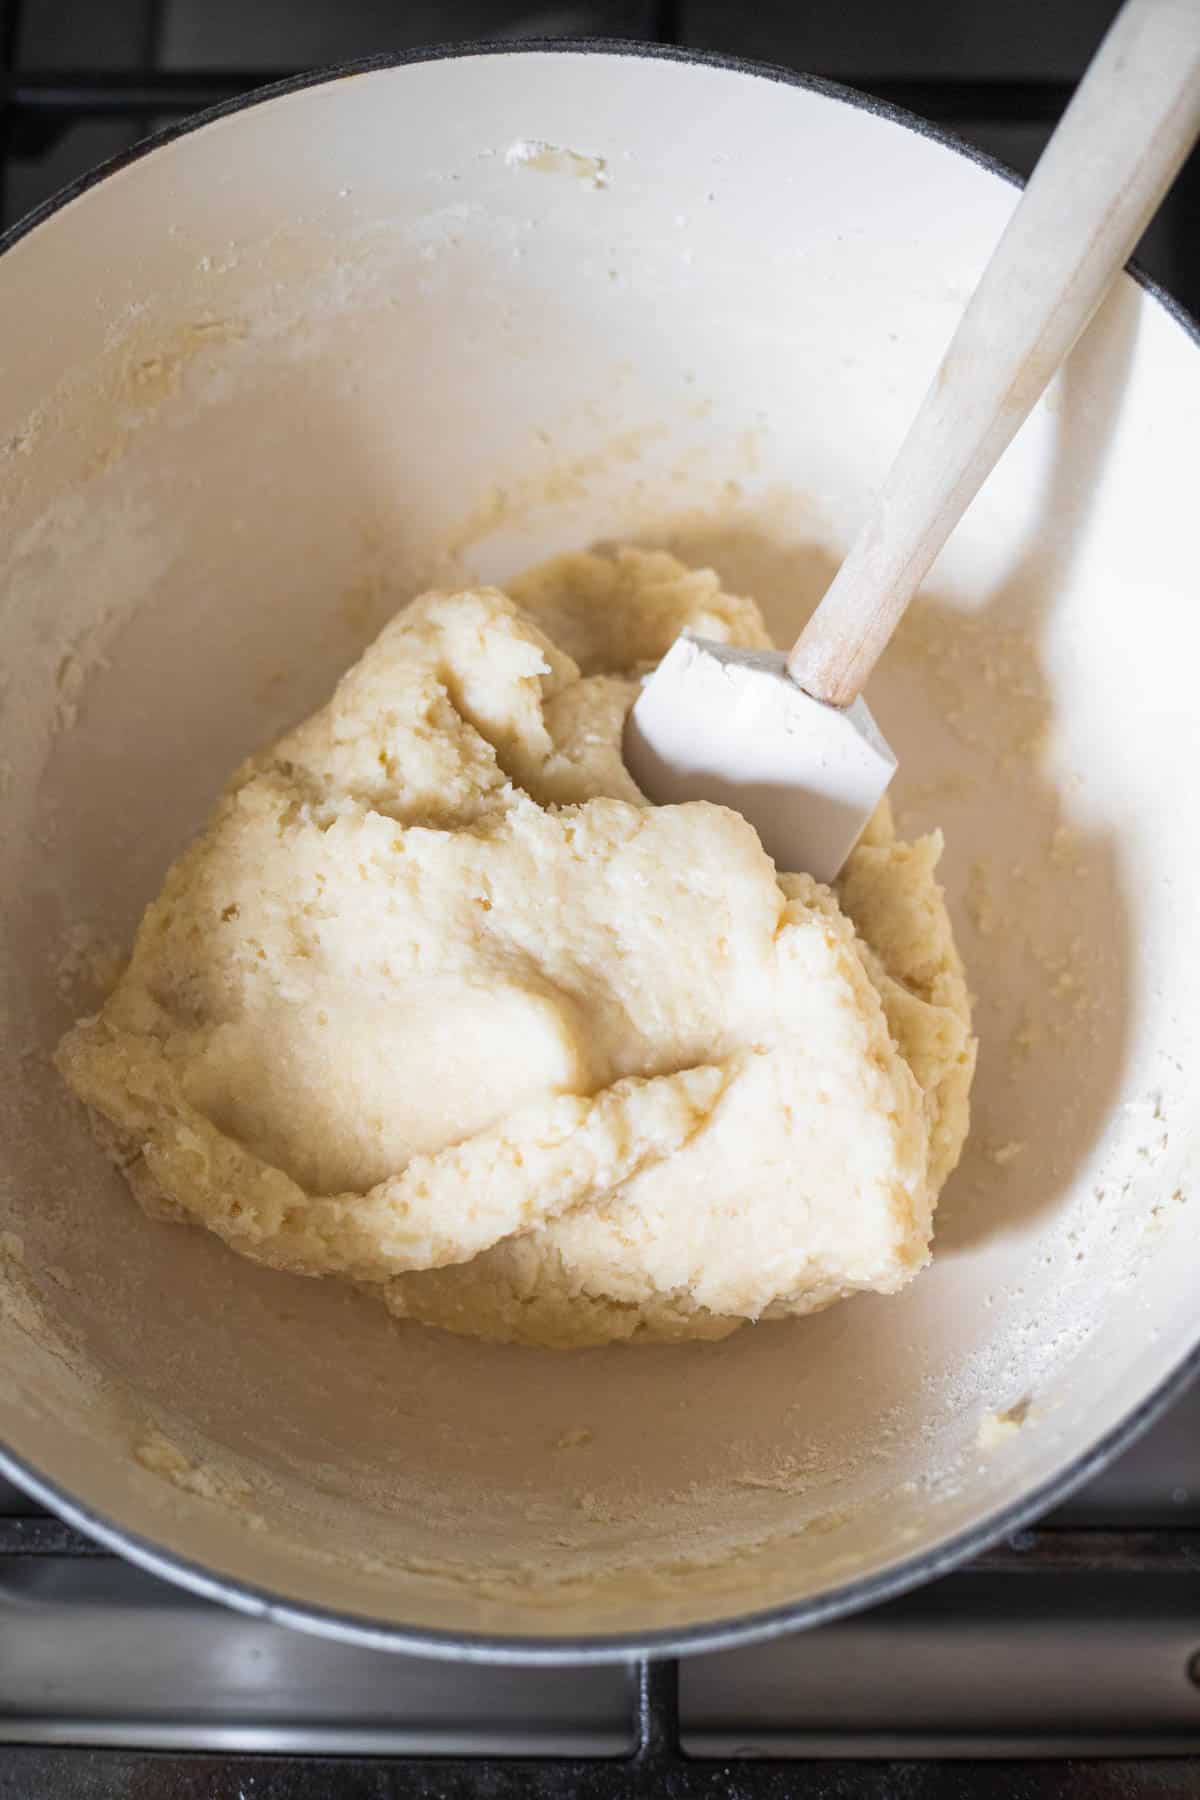
- In a 4.5 quart pot, bring the water, olive oil, salt and butter to a boil.
- Turn the heat down to the lowest setting and add the flour little by little, stirring quickly with a rubber spatula. As the dough forms, switch to bigger strokes and use the spatula to smooth the dough as it forms. It’s ok if the dough has some lumps.
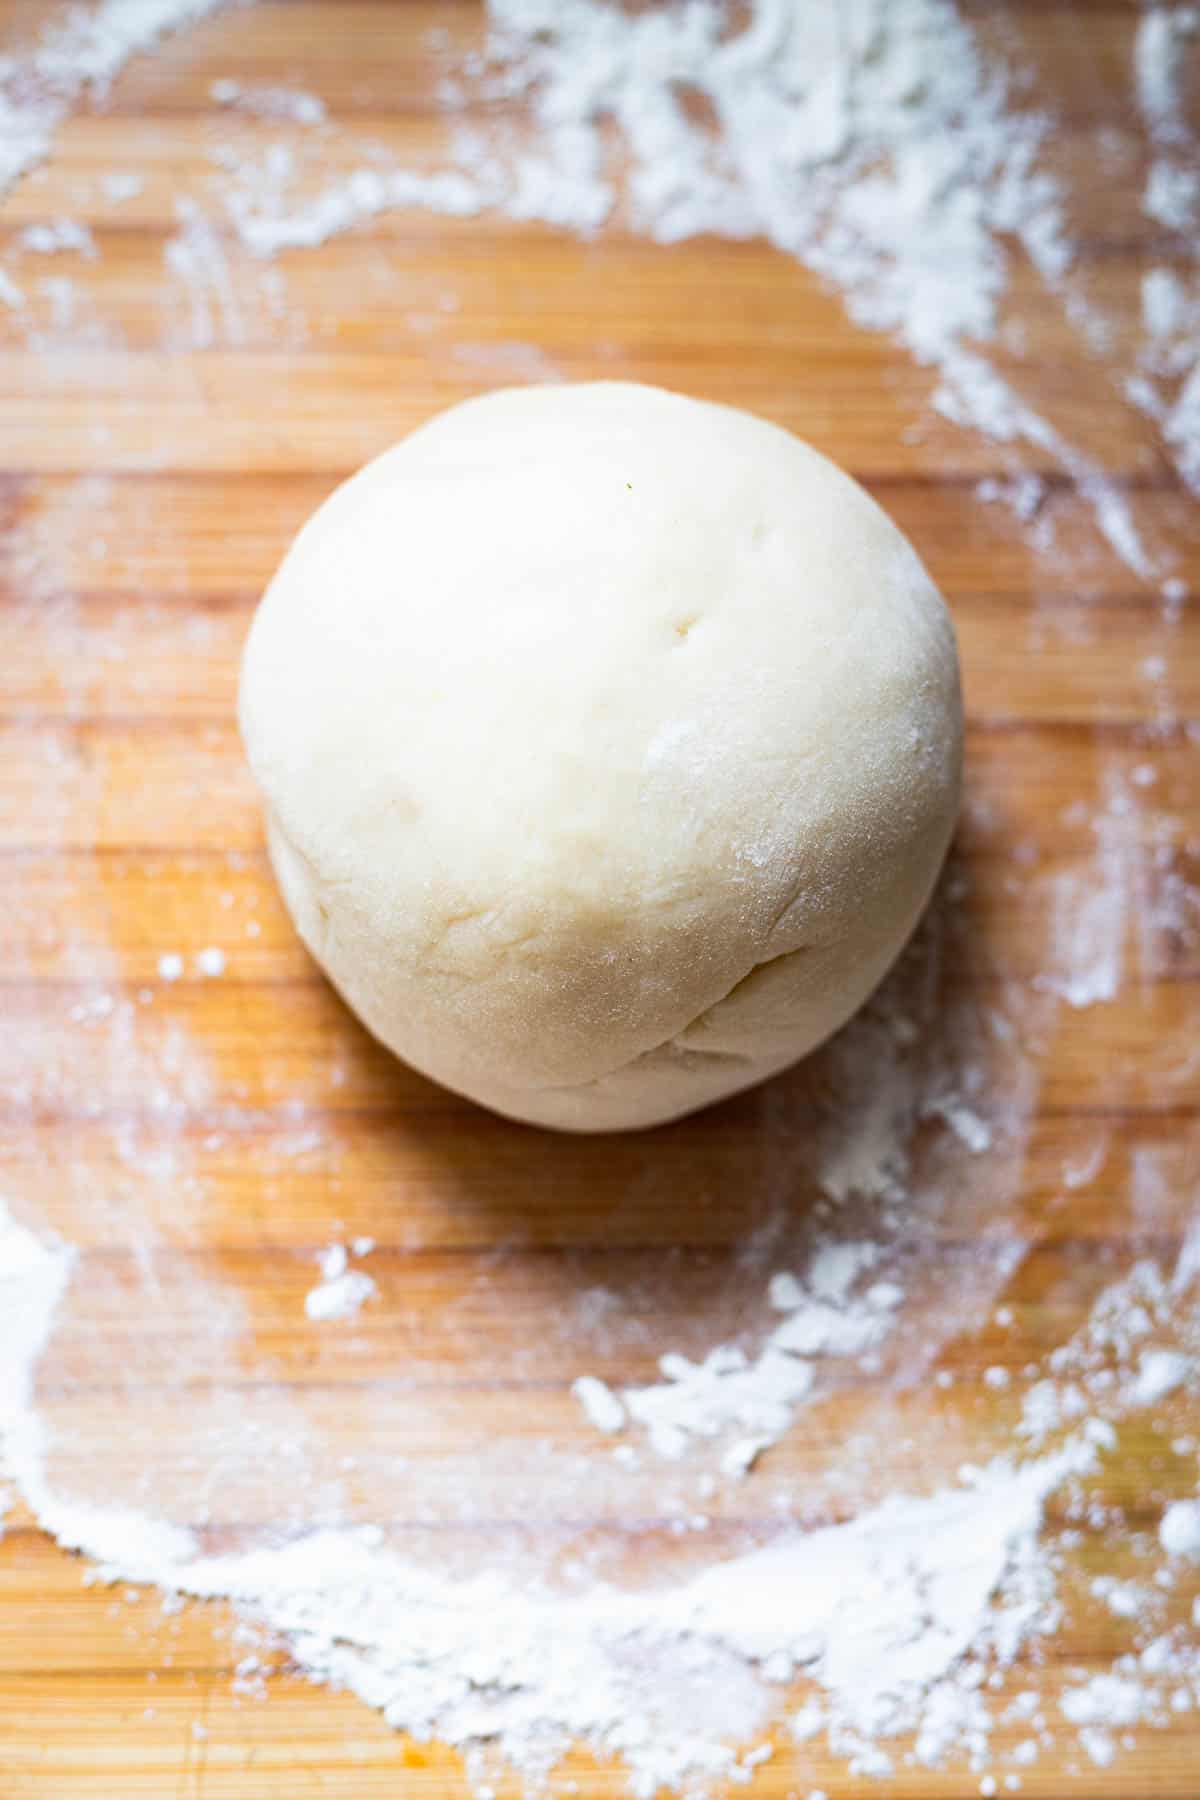
- Cut the flame and transfer the dough to a stand-mixer bowl. Use the dough-hook attachment to knead the dough on medium speed, until a mass of dough forms. To do this by hand, let the dough cool and knead it on a well-floured surface.
- Flour your hands and form the kneaded dough into a ball. Use a pastry cutter to divide the dough into 2 portions. Wrap one of the halves in plastic-wrap and set aside.
Assembling the rissois
- Roll out the unwrapped dough into a ¼″ sheet on a well-floured surface. Don’t forget to also flour the rolling pin.
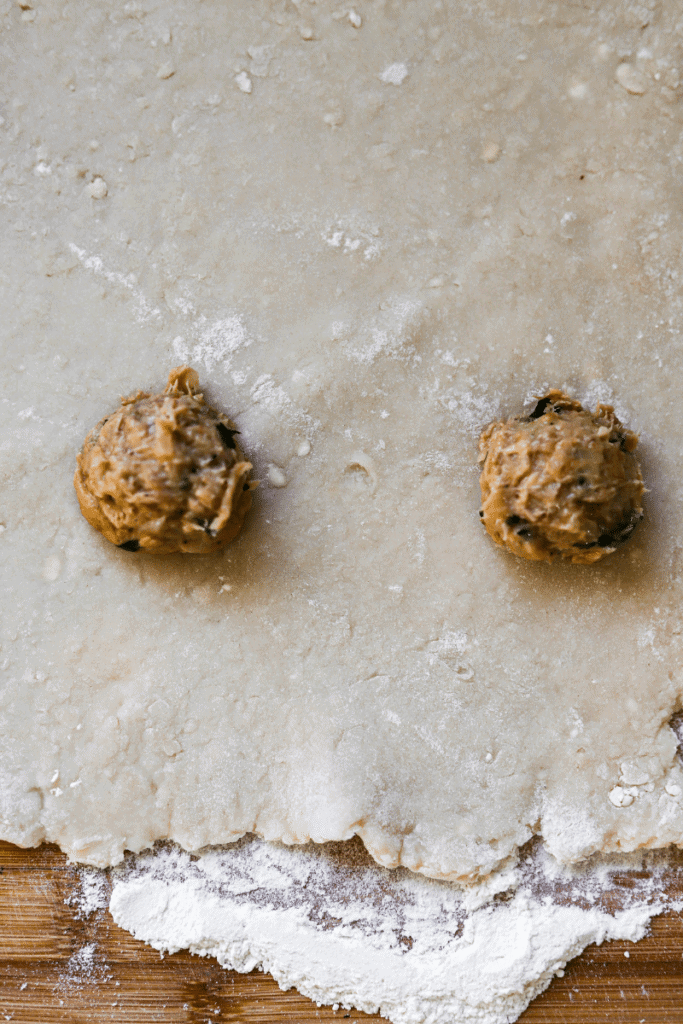
- Uncover the tuna filling and mix with a rubber spatula. Place 2-3 scoops (1 measured teaspoon each) of filling near the center of the dough. Leave about 2-3 inches between each scoop.
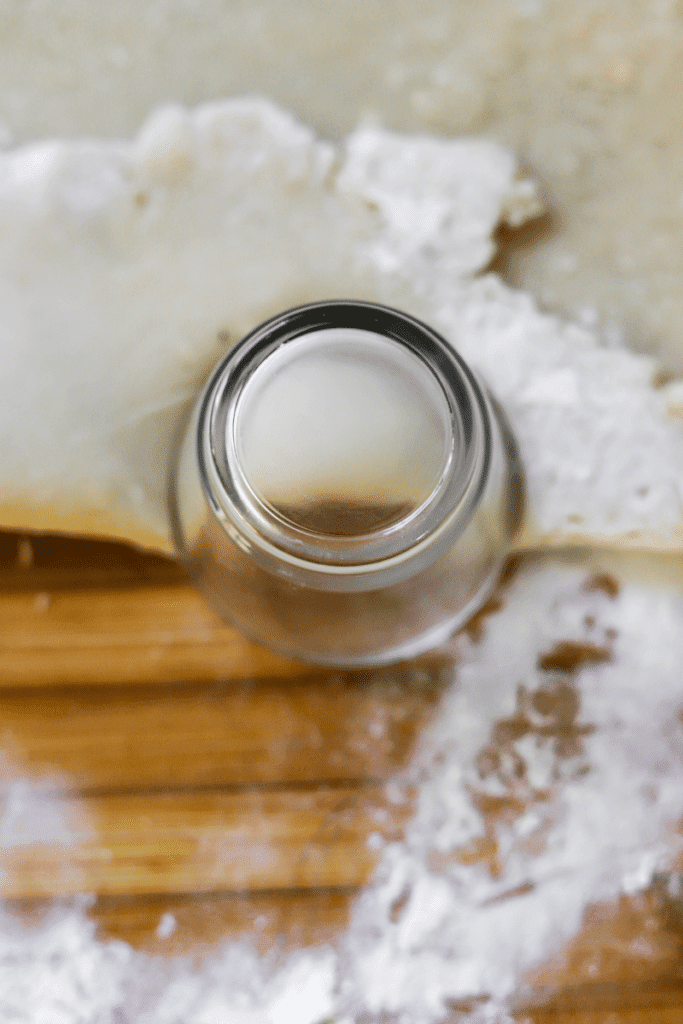
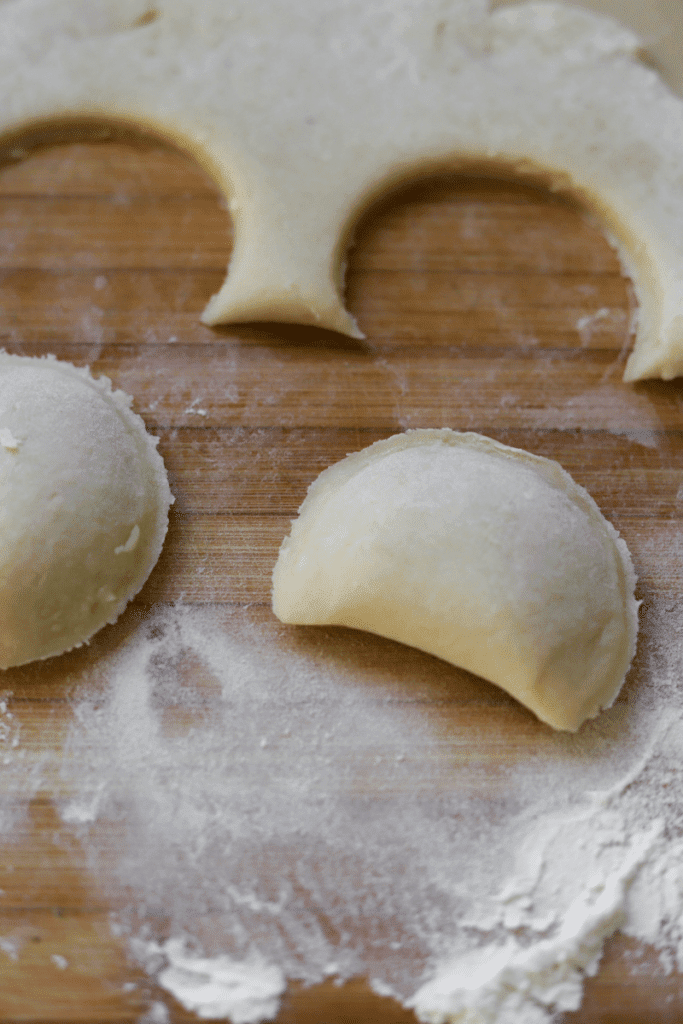
- Lift the bottom edge of the dough and fold it over the filling. The filling should touch the fold. Firmly stamp out the rissois using a small glass or cup. Leave some space between the filling and the glass’s edge, don’t let the filling touch the seam.
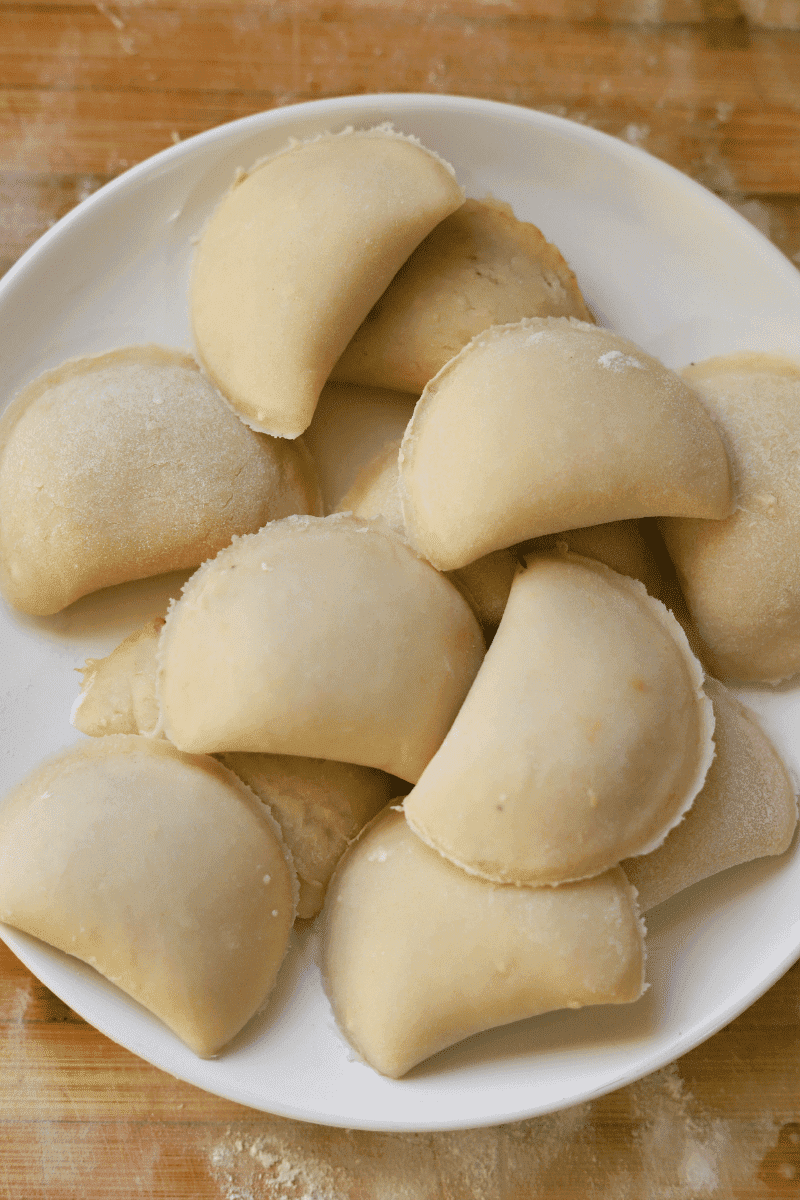
- Seal the rissois by gently pinching the edges – there’s no need to moisten them. Set the finished rissois on a plate, it’s ok to place them on top of each other.
- Once you’ve stamped out the rissois, form the remaining dough into a ball and roll it out again. Repeat the same process of scooping the filling and forming the crescents until you’ve used up all the dough and filling. You’ll end up with roughly two dozen rissois.
Breading and frying
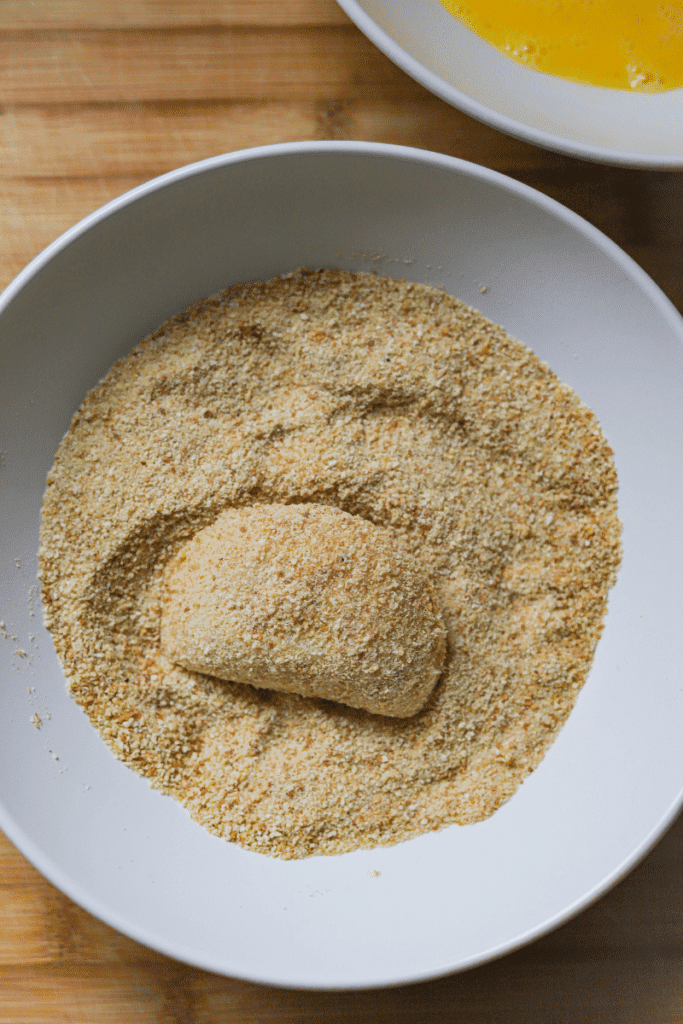
- In a bowl, make an egg wash by whisking 2 eggs with 2 teaspoons of water. Pour the breadcrumbs on a separate plate or shallow bowl.
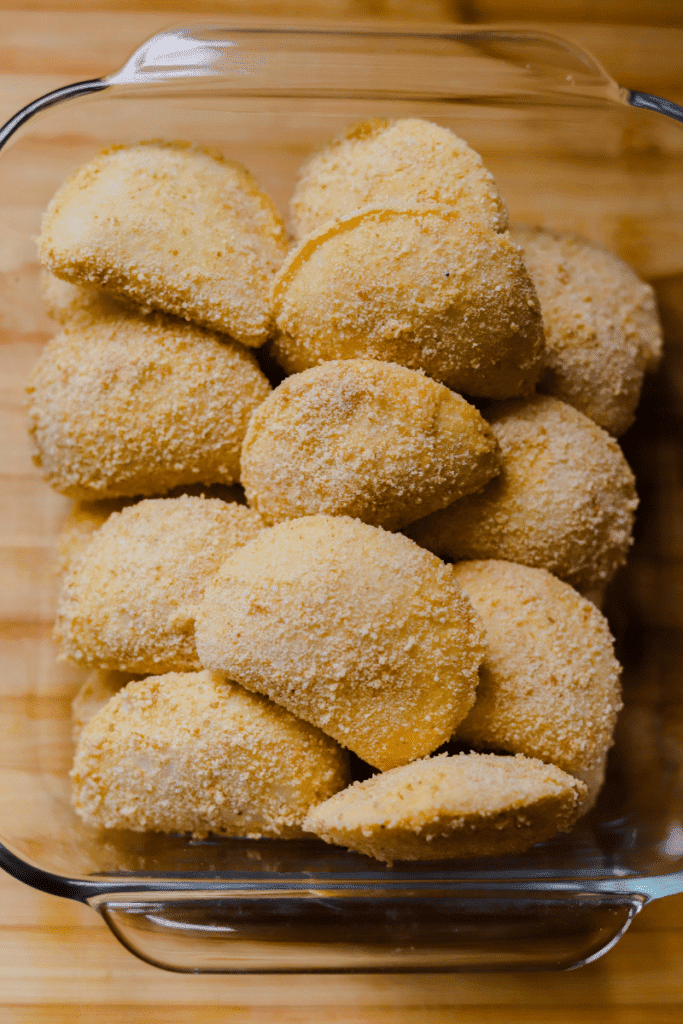
- Dip each of the rissois in egg and coat both sides with bread crumbs. Shake off any excess breadcrumbs gently. Set the rissois on a plate while you bread the rest.
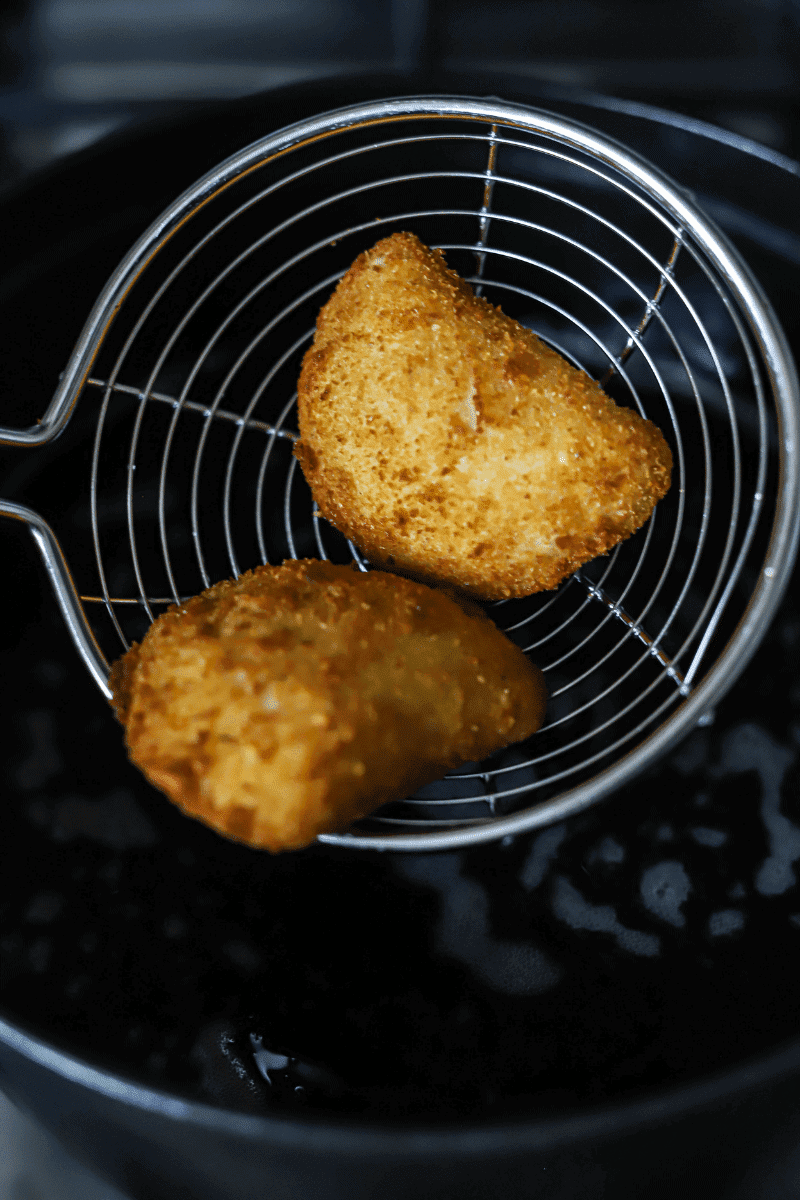
- Heat the oil to 325°F in a dutch oven or pot with deep sides. Working in batches of 4 or 5, deep-fry the rissois for about 1 minute on each side. Watch closely, as they brown quickly.
- Once deep-golden brown, remove the rissois from the oil using a fry basket or slotted metal spoon. Transfer to a cooling rack or tray lined with paper towels. Let the rissois cool slightly and serve.
Serving suggestions
Serve the rissois on a platter or plate, and garnish with fresh cilantro leaves. You can keep them in warm oven (heated to 170°F) until you’re ready to serve them.

Substitutions
Missing something from the list? Here are some alternatives:
- Domestic canned tuna can be used in place of imported. For flavor, I prefer tuna that’s packed in oil but tuna in water is a healthier alternative.
- Milk or half and half instead of heavy cream work fine as long as you mix it with flour, per the recipe steps!
- Fresh parsley can be used in place of cilantro.
- Unseasoned bread crumbs – if you don’t have the seasoned kind, you can use plain and season them on your own with salt, pepper, garlic powder and dried cilantro (coriander) or parsley.
Variations
Here are some alternative fillings you can use in place of tuna:
- Shrimp – check out my recipe for shrimp rissois!
- Bacalhau (cod fish) – is also commonly used for rissois.
- Chicken – if seafood isn’t your thing, minced or shredded chicken is a great substitute.
- Non-spicy – this recipe is not spicy in my opinion, but you can omit the chili paste/hot sauce if you want to be on the safe side.
Tools & Equipment
Here are some basic tools that will make this recipe a whole lot easier!
- Deep-fry thermometer – I like to keep a close eye on the temperature of the oil. If it gets too hot, the outsides of the rissois will brown too quickly and the inside will be doughy.
- I like to use cast iron for all my deep frying – check out this cast-iron dutch oven.
- Wire basket (strainer) for frying
- A stand mixer with a dough-hook attachment, saves your hands from kneading hot dough! Highly recommended.
Storing and reheating leftovers
Store leftover rissois in an air-tight container in the refrigerator for up to 2 days. Reheat in the oven at 375°F for about 10 minutes or until the outsides are crispy again.
Rissois can be assembled, dipped in breadcrumbs and frozen for later use. Fry the frozen rissois in oil at 325° – until they’re golden and crispy. No need to thaw them.
Expert tips
sprinkled some tips and tricks throughout the post – here they are in one place:
- For best results, knead the dough while it’s hot. This is why I recommend using a stand mixer.
- Use plenty of flour when dusting the kneading surface, otherwise the dough will stick to your surface and be hard to work with.
- Don’t overstuff the rissois and press down firmly when stamping them out.
- Change out the breadcrumbs with fresh ones if they start to clump together while you’re breading the rissois.
- Watch the temperature of the oil closely so the breadcrumbs don’t burn.

Tuna Rissois (Rissois de atum)
Ingredients
Filling ingredients
- 2 tablespoons olive oil extra virgin
- ½ cup onions diced small
- 1 tablespoon garlic crushed
- 10 ounced canned tuna packed in oil, drained
- 1 teaspoon garlic powder
- 1 teaspoon onion powder
- 1 teaspoon hot sauce or red chili paste
- 1 cup whole-milk
- 3 tablespoons flour
- Pinch salt and pepper
- 1-2 teaspoons fresh chopped cilantro
Pastry ingredients
- 2 cups water
- 2 tablespoons salted butter
- 1 teaspoon olive oil extra-virgin
- 2 teaspoons kosher salt
- 2 cups all-purpose flour
- 2 eggs
- 1 cup seasoned bread crumbs
- 3-4 cups canola or vegetable oil for frying
Instructions
Filling instructions:
- Whisk 3 tablespoons of flour with 1 cup of whole-milk in a small bowl or cup, set aside.
- Heat 2 tablespoons of olive oil in a 3-quart saucepan. Add the onions and cook until translucent. Add the garlic, tuna, hot sauce, dry seasonings and cook until fragrant.
- Add the milk/flour mixture and cook for 3-5 minutes, until bubbly and thick. Make sure to stir occasionally. Cut the flame, stir in the fresh cilantro then cover the pan and set aside
Dough instructions:
- In a 4.5 quart pot, bring 2 cups of water, 1 teaspoon of olive oil, 2 teaspoons of salt and 2 tablespoons of butter to a boil.
- Turn the heat down to the lowest setting and add the flour little by little, while stirring quickly with a rubber spatula. As the dough forms, switch to bigger strokes and use the spatula smooth the dough as it forms. The dough will be sticky and may have lumps, this is ok!
- Cut the flame and transfer dough to a stand-mixer bowl. Use the dough-hook attachment to knead the dough on medium speed, until a ball forms. If you're not using a mixer, you'll need to let the dough cool and knead it by hand on a well-floured surface.
- Flour your hands and form the kneaded dough into a ball. Use a pastry cutter to divide the dough into 2 portions. Wrap one of the halves in plastic wrap and set aside.
Assembling and frying:
- Roll out the unwrapped dough into a ¼" sheet on a well-floured surface. Don't forget to also flour the rolling pin.
- Uncover the tuna filling and mix with a rubber spatula. Place 2-3 scoops (1 measured teaspoon each) of filling near the center of the dough. Leave about 2-3 inches between each scoop.
- Lift the bottom edge of the dough and fold it over the filling. The filling should touch the fold. Firmly stamp out the rissois using a small glass or cup. Leave some space between the filling and the glass's edge, don't let the filling touch the seam.
- Seal the rissois by gently pinching the edges - there's no need to moisten them. Set the finished rissois on a plate, it's ok to place them on top of each other.
- Once you've stamped out the rissois, form the remaining dough into a ball and roll it out again. Repeat the same process of scooping the filling onto the dough and forming the crescents until you've used up all the dough and filling. You'll end up with roughly two dozen rissois.
- In a bowl, make an egg wash by whisking 2 eggs with 2 teaspoons of water. Pour the bread crumbs on a separate plate or shallow bowl.
- Dip each of the rissois in egg and coat both sides with bread crumbs. Shake off any excess bread crumbs gently. Set the rissois on a plate while you bread the rest.
- Heat the oil to 325°F in a dutch oven or pot with deep sides. Working in batches of 4 or 5, deep-fry the rissois for about 1 minute on each side. Watch closely, as they brown quickly.
- Once deep-golden brown, remove the rissois from the oil using a fry basket or slotted metal spoon. Transfer to a cooling rack or tray lined with paper towels. Let the rissois cool slightly and serve.
Notes
- A stand-mixer is highly recommended for kneading the dough since it will be hot to the touch.
- Be generous with the flour when dusting the kneading surface. Sticky dough tears easily!
- Press firmly when stamping out the rissois and don't overstuff them.
- Watch the temperature of the oil closely so the breadcrumbs don't burn.
- The assembled rissois can be frozen for a later date. No need to thaw before frying them.
- Leftover rissois can be refrigerated and reheated in the oven at 375°F for 10 minutes.
Nutrition
Food Safety
Here are a few safety tips:
- Don’t leave the rissois sitting out at room temperature for extended periods
- Never leave the rissois frying unattended
- Use oils with high smoking point to avoid harmful compounds
- Always have good ventilation when using a gas stove
See more guidelines at USDA.gov.
Avelina says
I have tried many Rissois and these are the best. My daughter made all three the Tuna, Chicken and Shrimp.