
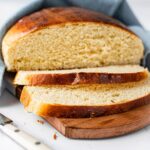
Now you can make Portuguese sweet bread right at home! Also called pão doce (sweet bread) or massa sovada (beaten dough), this light and fluffy homemade sweet bread is best served warm with butter. This recipe is easy to follow and makes 2 loaves or 16 rolls.
Living in New England has its perks and having a local Portuguese bakery is a major one. Growing up, we always had Portuguese sweet bread in our home. My grandmother didn’t bake bread, but she did know quality. We’d walk to the bakery with her to buy it on weekends, which seemed like just as much work to me.
A lot of people associate sweet bread with Easter, but my Cape Verdean family didn’t need a special occasion, just coffee or tea with some milk.
Jump to:
❤️ Why you’ll love this recipe
- Portuguese sweet bread has the perfect taste and texture—it’s light, fluffy, and just sweet enough. The enriched dough is made with eggs, milk, and sugar, giving it a soft, tender crumb and rich flavor. It reminds me of brioche, just a tad sweeter. If you love brioche or challah, this is the bread for you.
- Clear instructions and step-by-step photos guide you through each step of the process. Take a minute to read through the entire post before jumping to the recipe card—it’ll make everything go more smoothly.
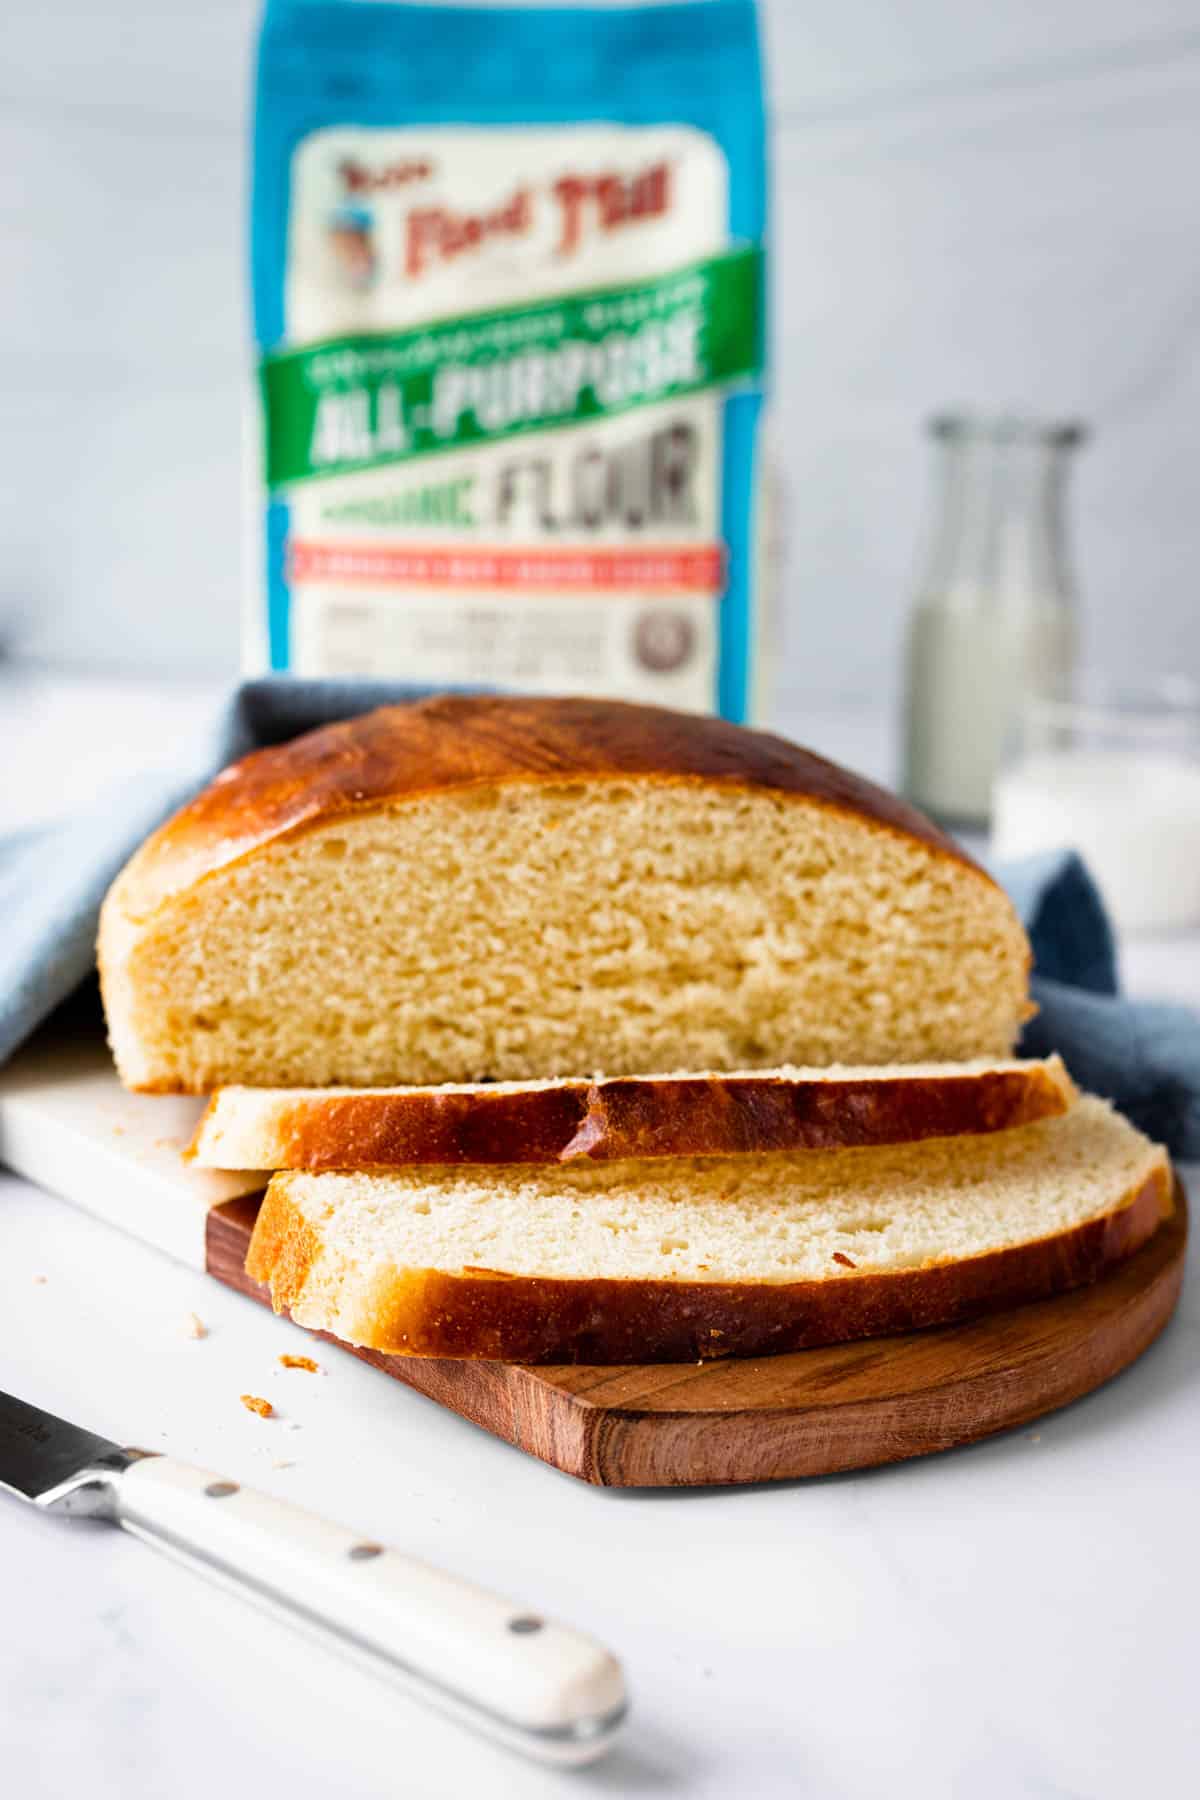
- Quality ingredients = consistent results! I highly recommend a using a high quality flour, and unexpired yeast to get a proper rise and the right consistency. Make sure you measure the flour properly by spooning the flour into a measuring cup and leveling it off without packing it down.
- Stays fresh frozen for up to 3 months, just make sure to wrap it tightly in plastic wrap and store it in a freezer bag.
- Never baked with yeast before? I show you how to proof active dry yeast (dissolving it in warm liquid with a little sugar to help it activate). Or, you can skip that step and use instant yeast instead.

Tools & Ingredients
You don’t need any special tools or equipment, but if you have a stand mixer with a dough hook attachment, use it! If you don’t have either one, don’t worry, this recipe involves some kneading by hand anyway. All you’ll need is a large bowl, spatula and a flat, clean surface.
- Dry ingredients: All-purpose flour, granulated sugar, and salt form the base of the dough. Use a high-quality flour if you can—it really makes a difference in the texture.
- Active dry yeast helps the dough rise and gives the bread its soft, fluffy texture. It needs to be dissolved in warm milk first—this is called “proofing”, which I explained briefly above. If proofing the yeast feels too complicated, use instant yeast instead—just mix it right in with the dry ingredients and make sure it’s not expired.
- Wet ingredients: whole milk, large eggs, and softened uusalted butter add richness and moisture to the dough. You can use salted butter, but it might affect the taste slightly. Don’t omit the salt that’s listed in the ingredients! Salt helps with formation of gluten which gives dough elasticity. Some people like to add vanilla extract or lemon zest for flavor, it’s not something I do, but some people swear by it.
- Other ingredients: cooking spray grease your bowls and pans, and egg wash (1 egg mixed with 2 teaspoons of water) to give the bread it’s golden brown crust. If you want to use butter instead of spray to grease your baking pans, you can.
Refer to the recipe card at the bottom of this post for quantities and measurements.
Recipe steps with photos
You can follow along closely and refer to the visuals, or scroll down to the recipe card. If it’s your first time, I suggest reading through all of the steps before starting.

Combine wet and dry ingredients and proof the yeast
Step 1: Use a stand mixer with paddle attachment to combine the eggs, butter, sugar and salt together. If you don’t have a stand mixer, you can use a fork to cream the butter and then mix in the sugar, salt and eggs using a whisk. Set this mixture aside.
Step 2: Heat the milk in a small saucepan until it reaches 115°F. Pour half of the milk into the butter/sugar and egg mixture, and the other half into a cup. Mix 1 teaspoon of sugar into the cup of milk then add the yeast. Mix and let sit for 10 minutes. It will foam and expand in volume.
Note: If the yeast mixture doesn’t foam or expand as shown in the photo above, it’s no good. You’ll need to start this step over with fresh (unexpired) yeast and new milk.
Form the dough and let it rise
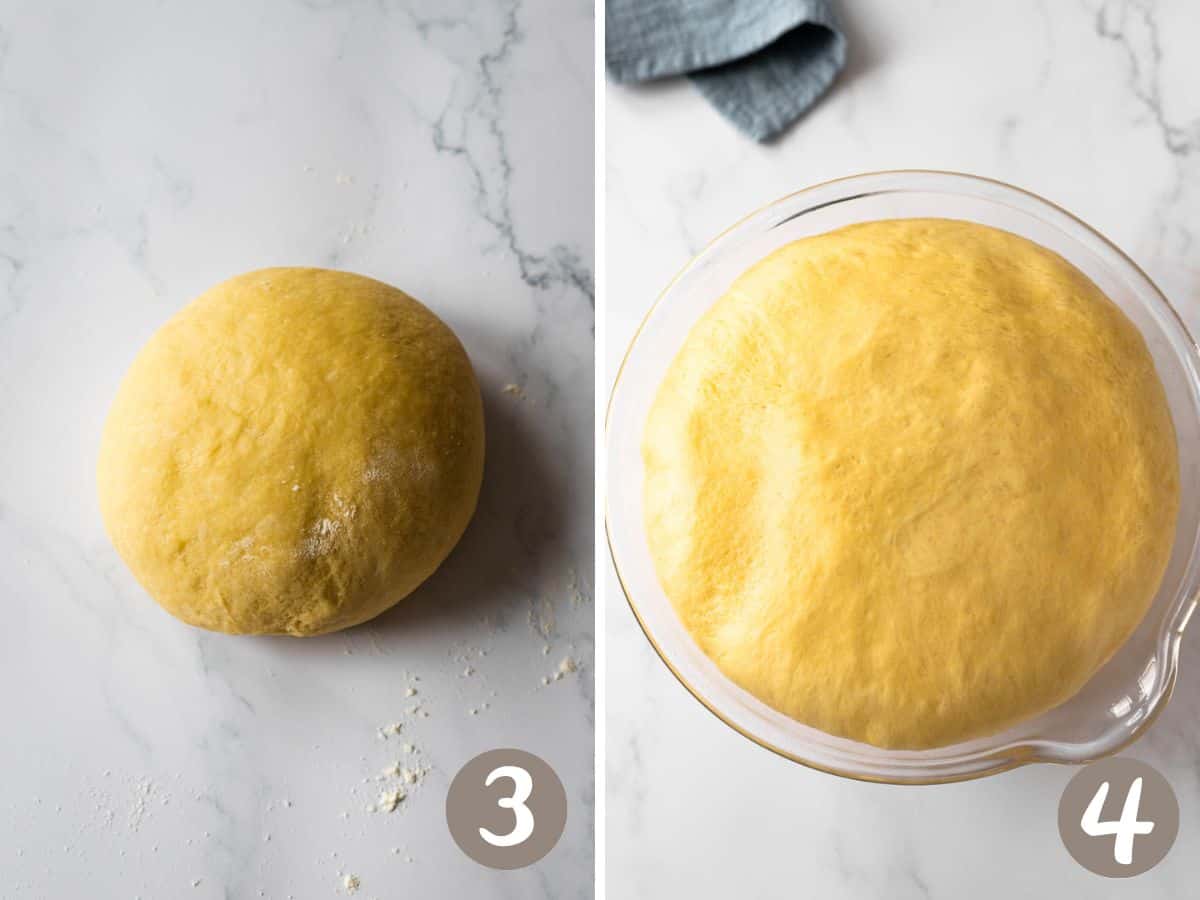
Step 3: Add the proofed yeast/milk to the bowl with the wet mixture. Replace the paddle attachment with a dough hook. Turn your mixer on low speed and add ½ cup of flour to the bowl at a time. A ball of dough will form on the dough hook. Shut the mixer off and transfer the dough to a floured surface. Knead the dough by hand for 7 full minutes.
Step 4: Shape the kneaded dough into a ball. Transfer the ball of dough to a greased bowl and cover it with plastic wrap or a kitchen towel. Let the dough rise in a warm place (like an oven set to 170 degrees) for an hour and a half.
Forming and kneading the dough by hand: put the flour in a large mixing bowl and create a well in the center. Pour the wet mixture in and use a rubber spatula to combine the ingredients. Transfer the dough to a floured surface and knead by hand for 10 minutes.
Shape the loaves or rolls
Step 5: Remove the dough from the oven. The dough should have roughly doubled in volume. Remove the plastic wrap/kitchen towel and punch the dough down to release the air. Divide the dough in half and shape each half into a ball.
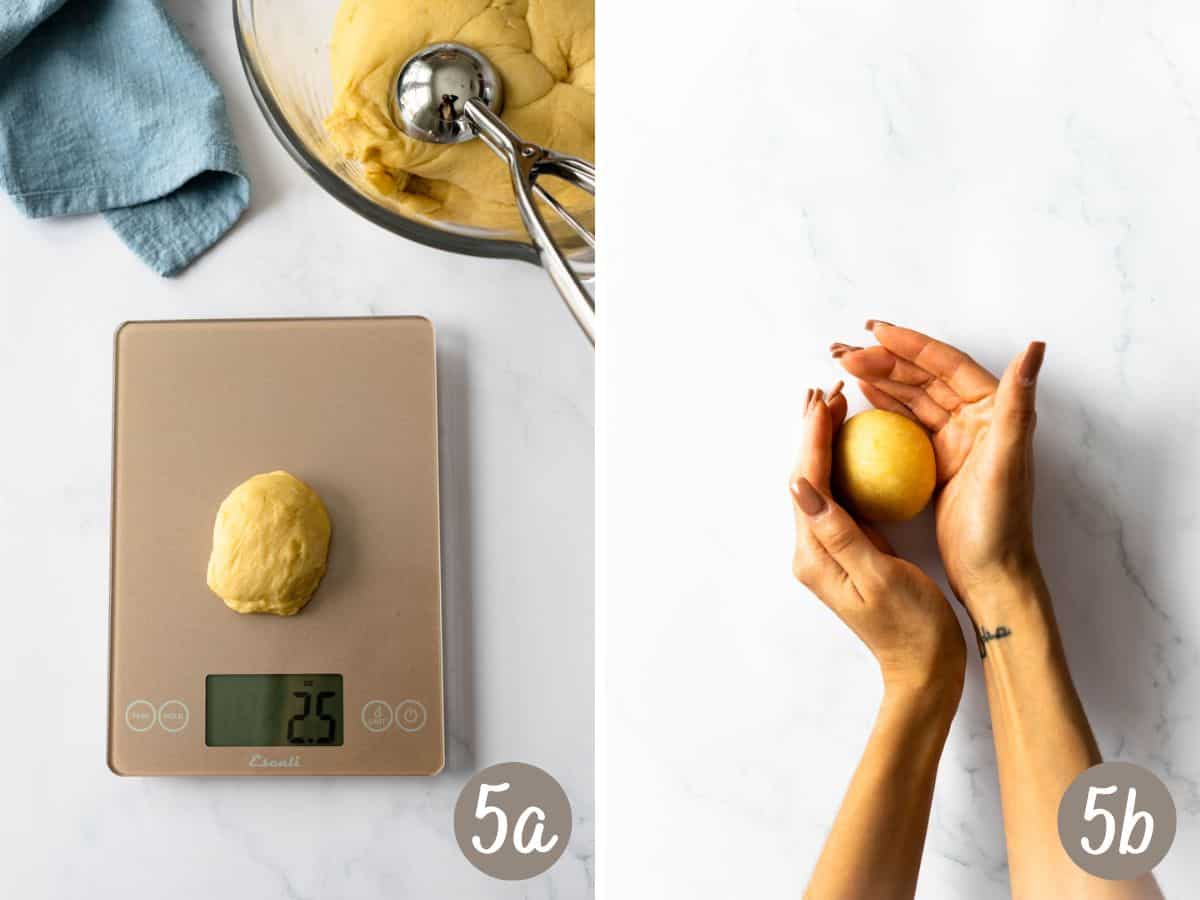
Making rolls: Leave the dough in the bowl to keep it covered so it doesn’t dry out. Portion the rolls into equal pieces, placing them on a kitchen scale if you have one. Each roll should weigh 2.5 ounces (or look about the same size as the others).
Shape each loaf or roll into a tight ball by cupping your hands while turning against a flat surface (refer to the photo above). It’s the same shaping method whether you’re making loaves or rolls.
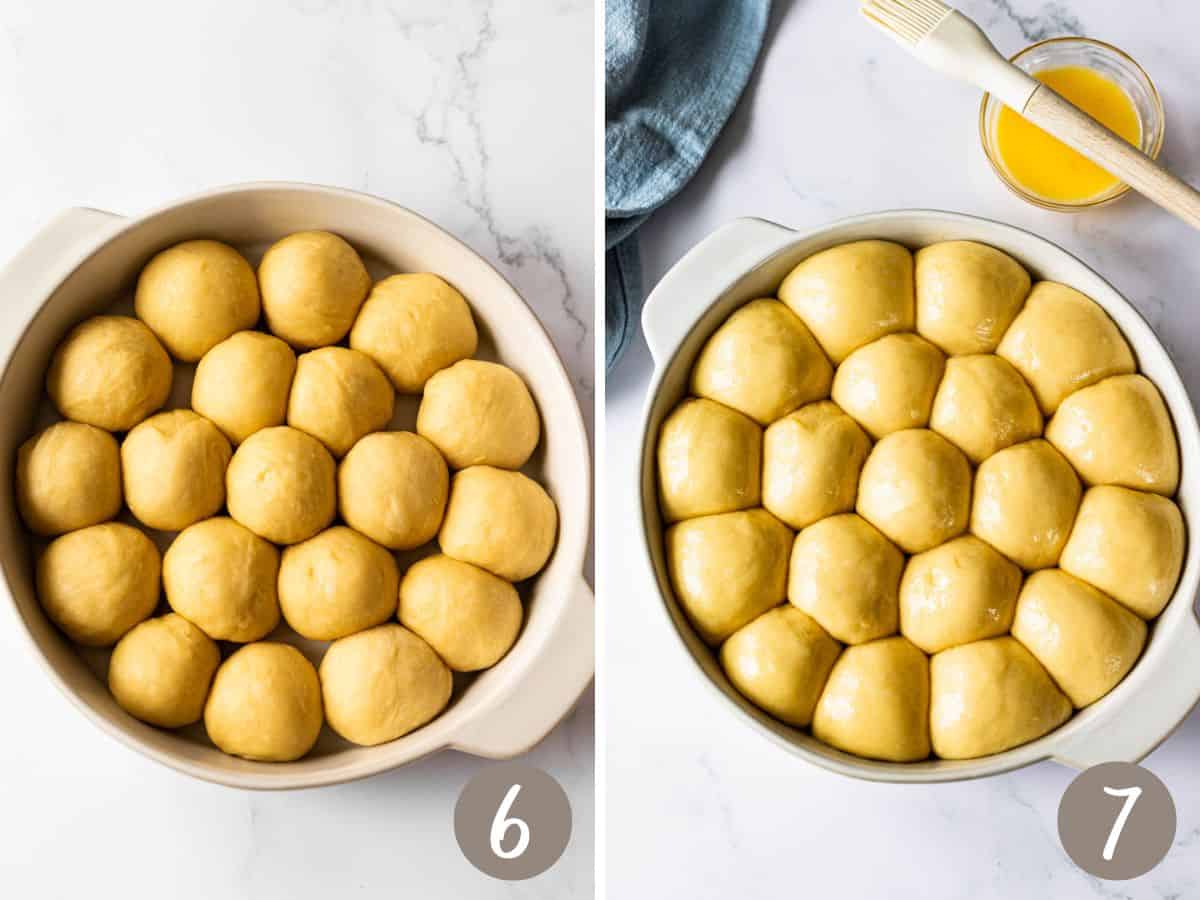
Brush the tops and bake
Step 7: Pre-heat your oven to 375°F (make sure the oven is empty, you don’t want to pre-heat the oven while the dough is rising in it). Make the egg-wash by mixing 1 whole egg with 2 teaspoons of water. Gently brush the egg wash over the rolls using a pastry brush.
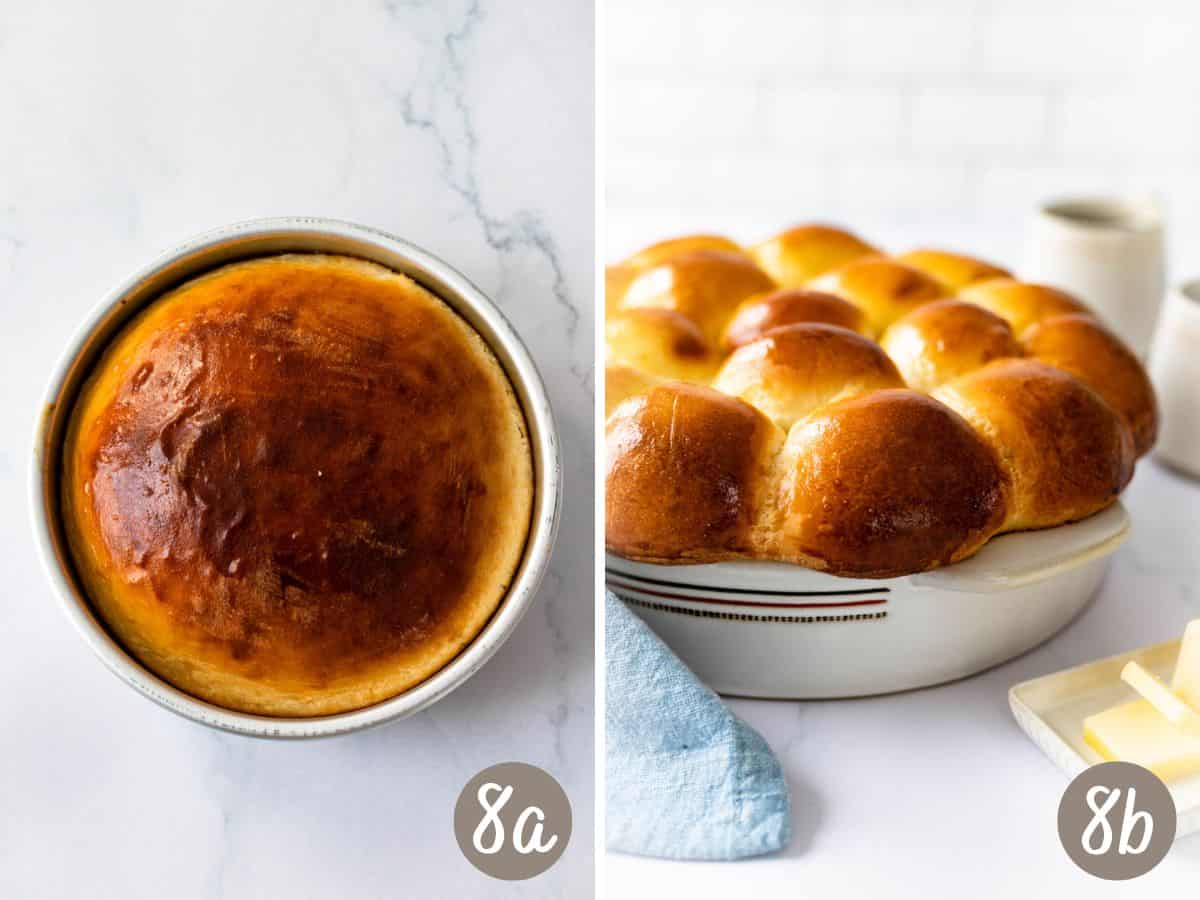
Step 8: Bake the sweet bread at 375°F for 25 minutes. Use your oven light to watch the color of the bread closely. Check the color around the 15-20 minute mark. If it’s starting to look too dark, place a sheet of foil over the bread and continue baking for the remaining 10-15 minutes.

Let the bread cool and slice it
Step 9: Let the bread cool fully in its pan for 30-40 minutes. Remove the rolls/loaves by flipping the pans over. Slice the loaves using a serrated knife. Separate the rolls by cutting them with a knife or pulling them apart with your hands.
Serving Suggestions
Sweet bread is best served warm with:
- Soft butter and a cup of milk, hot coffee or tea
- Your favorite soup, caldo verde, canja, or homemade tomato soup
- Your favorite Easter or holiday dishes
- You can also turn stale sweet bread into croutons or french toast! You can dry the bread out by slicing and leaving it uncovered for a couple of hours.
❓FAQ’s
Wrap any leftover bread in plastic wrap or place it in a ziploc bag to prevent it from drying out or getting stale. Store it at room temperature for up to 3 days.
Sweet bread can be frozen for up to 3 months. To protect against freezer burn, wrap the rolls or loaves in plastic wrap first then place them in freezer bags and store in the freezer. Let the bread thaw at room temperature before serving.
Sweet bread was brought to Hawaii by Portuguese immigrants, where it remains popular today. Hawaiian bread is usually served as rolls but the texture and taste are very similar, if not identical.
⭐ Other recipes you’ll love


Love this recipe? Please leave a 5-star 🌟🌟🌟🌟🌟rating in the recipe card below & consider scrolling down and leaving me a review if you REALLY liked it. Thanks!

Portuguese Sweet Bread Recipe (Massa Sovada/Pão Doce)
Equipment
- stand mixer see recommended attachments below
- paddle attachment for creaming the eggs, butter, sugar
- dough hook for kneading the dough
Ingredients
- 3 large eggs
- ¼ cup unsalted butter softened
- 1 cup granulated sugar plus 1 teaspoon for proofing the yeast
- 1 teaspoon kosher salt
- 1 cup whole milk
- 2 and ½ teaspoons active dry yeast this is equal to 2 packets
- 5 and ½ cups all-purpose flour
- egg wash: 1 large egg + 2 teaspoons water
Instructions
- Use a stand mixer with paddle attachment to combine the eggs, butter, sugar and salt together. If you don’t have a stand mixer, you can use a fork to cream the butter and then mix in the sugar, salt and eggs using a whisk. Set this mixture aside.
- Heat the milk in a small saucepan until it reaches 115°F. Pour half of the milk into the butter/sugar and egg mixture, and the other half into a cup. Mix 1 teaspoon of sugar into the cup of milk then add the yeast. Mix and let sit for 10 minutes. It will foam and expand in volume.
- Add the proofed yeast/milk to the bowl with the wet mixture. Replace the paddle attachment with a dough hook. Turn your mixer on low speed and add ½ a cup of flour to the bowl at a time. A ball of dough will form on the dough hook. Turn the mixer off and transfer the dough to a floured surface. Knead the dough by hand for 7 full minutes.
- Shape the kneaded dough into a ball. Transfer the ball of dough to a greased bowl and cover it with plastic wrap. Let the dough rise in a warm place for an hour and a half.
- Remove the dough from the oven. The dough should be almost doubled in volume. Remove the plastic wrap and punch the dough down to release the air. Divide the dough in half and shape each half into a ball OR portion the dough into 16 rolls. Shape each roll into a tight ball by cupping your hands and turning against a flat surface.
- Place the rolls in a greased 10-inch round pan (use two 8-inch round pans if you’re baking two loaves). Cover the baking pan(s) with a kitchen towel and let rise again in a warm oven for 1 hour. The bread will expand even more during the second rise.
- Pre-heat your oven to 375°F (don’t heat the oven while the dough is rising in it). Make the egg-wash by mixing 1 whole egg with 2 teaspoons of water. Gently brush the egg wash over the rolls using a pastry brush.
- Bake the sweet bread at 375°F for 25 minutes. Use your oven light to watch the color of the bread closely. Check the color around the 15-20 minute mark. If it’s starting to look dark, place a sheet of foil over the bread and let it continue to bake for the remaining 10-15 minutes.
- Let the bread cool fully in its pan for 30-40 minutes. Remove the rolls/loaves by flipping the pans over. Slice the loaves using a serrated knife. Separate the rolls by cutting them with a knife or pulling them apart with your hands.
- Serve warm with butter.
Notes
- Measure your flour correctly – spoon the flour out of the bag into a dry ingredient measuring cup. Don’t use your measuring cup as a scoop and don’t pack the flour down. Use the flat edge of a butter knife to level off the flour.
- Check the date on your yeast to make sure it’s not expired and don’t overheat the milk. A kitchen thermometer can help you get an accurate reading of the milk’s temperature – it shouldn’t exceed 115°F.
- Dough rises better in a warm oven. Heat your oven to 170°F and place the dough in the oven for each rise. Once the oven is warm, shut the temperature off and keep the door closed so the heat doesn’t escape.
Dee says
The yeast measurement says 2.5 teaspoons and that it equals two packets. This is incorrect, a packet is 2 1/4 tsp of yeast, so which one do you use? 2 packets is 1 1/2 tbls or just the one 2 1/4 packet of yeast?
Crystal DaCruz says
Hi Dee,
Thank you for bringing this to my attention. It’s 2.5 teaspoons of yeast. I buy my yeast in a jar and spoon it out. I will adjust the part of the recipe that references the packets.
Judy says
Great recipe. Best simple recipe out there.
Natalie says
I will try the recipe today! But I am confused how you will put plastic wrap and then a towel in the oven at 170. Feel that is unsafe and the plastic wrap will 100% melt.
Crystal DaCruz says
Hi Natalie, I’ve never had an issue with the plastic melting. You can just preheat the oven to 170 and shut it off keeping the oven door closed if that feels better for you, or just let the dough rest at room temperature.
maria says
Maybe you can use parchment paper. its so the dough doesnt stick to the towel
Silver says
Dough did not rise even though yeast proofed correctly. Something in the dough killed the yeast.
Daniel, Rezendes says
Growing up in New Bedford Massachusetts I really miss the Portuguese cooking that I grew up with. I know I live in Florida and I will be attempting to make your recipes. Thank you. God bless you
Victoria says
Heeeey from Fall River; and moved away also- did you end up trying it?? Was it good?? Plan on trying it for valentines day to suprise my husband (also from that area so we know what its supposed to taste like lol)
Alice says
I grew up in Marion, MA. My grandparents are from the Cape Verde Islands.
I moved to SC and miss creole food, too. So glad I found this website.
Maryanne says
Tried this recipe twice and dough did not grow. It’s not a wet enough dough to rise it’s too dry.
Ann says
Has anyone ever tried making this gluten free? Two celiacs in the family would love for me to try
Jessy says
This was delicious! The only problem is that I cut the first loaf and it was still raw in the middle. I put the other one back in and it came out better, but next time I’ll have to bake a little longer. Thank you! ☺️