
Nobody could have told me a year ago that a tender, flaky, all-butter pie crust was easy. I just couldn’t get it right. It took me just about a year to perfect my own pie crust method. I could have easily switched it up, and used shortening (which is ok to do), but I really like the taste of butter, so I had to get the all-butter crust right.
An all-butter pie crust can be tricky. The main things that people struggle with when working with all-butter crusts (or just pie crusts in general), are shrinkage and toughness. For me, here’s what I was doing wrong:
- Not keeping my butter cold enough
- Over-working my dough by mixing it with a food processor
- Not giving the dough enough time to rest/chill
For some strange reason I used to be married to the idea of using my food processor to make my pie dough. Huge mistake! Once I ditched the food processor, I noticed an immediate improvement in the quality of my crust. Using a pastry cutter helped somewhat, but I didn’t like how the butter got stuck in the blades.
The solution for keeping your butter cold
Insert the box grater and frozen butter! Using frozen butter is a great way to ensure that the butter stays cold throughout the dough-making process. Cold butter yields a tender, flaky crust. Grating the butter also eliminates the the need for a food processor or pastry cutter.
Some other cardinal mistakes of pie-crust making are over-working your pie dough (tough crust), and not chilling/giving your dough enough time to chill and rest (warped/shrunken crust).
Here are some step by step directions for a tender, flaky and delicious all-butter pie crust every time!
Step 1: Get all of your ingredients ready
You should already be used to doing this when you bake, but having all of your ingredients laid out before you start is going to make this process more organized and a lot less frantic. Remember, time is of the essence because you want your ingredients to remain as cold as possible. Having everything in reach will help you work quickly and efficiently.
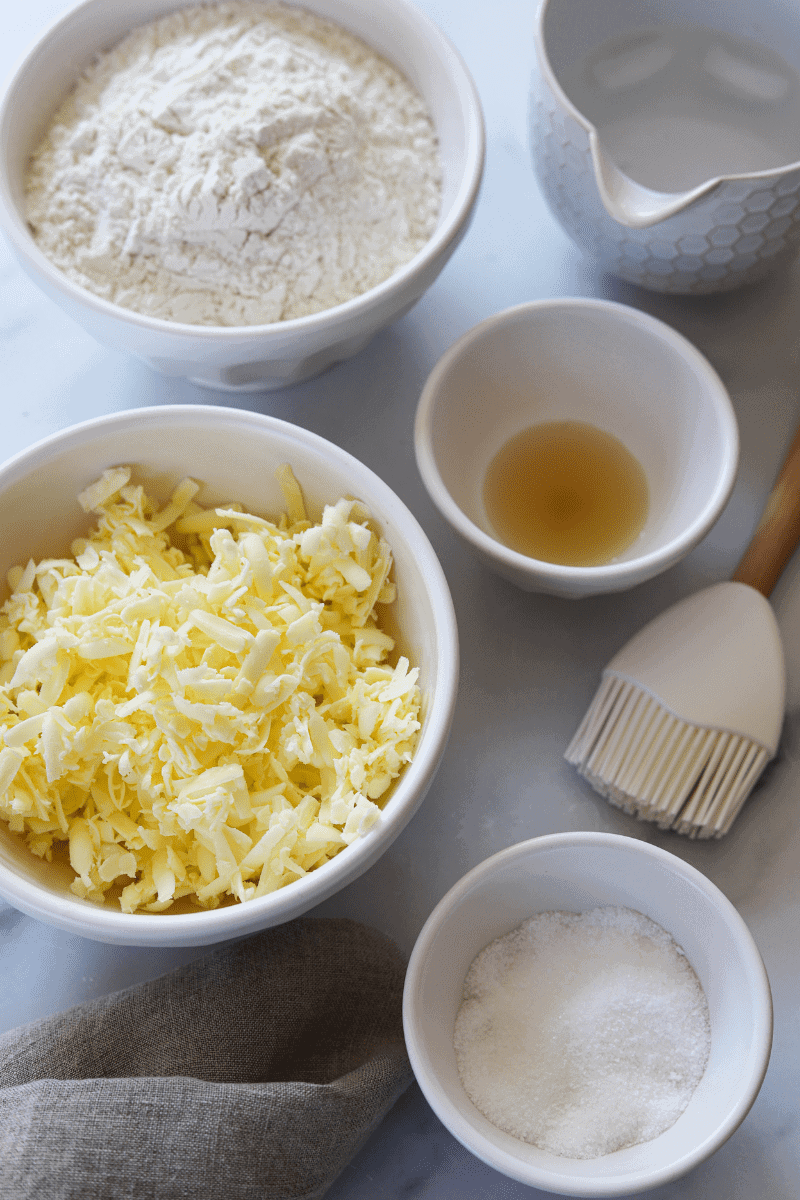
Combine your dry ingredients first: all-purpose flour, sugar, and salt . Whisk them together and set them aside. Then mix your water, apple cider vinegar and a few ice cubes in a liquid measuring cup and set aside.
Grate the frozen butter last so that it stays ice cold. Also don’t cut your butter into tablespoons. It’s much easier to grate a stick of butter than it is to grate little cubes. Your fingers will thank you. I peel back the paper as I grate the butter so my warm hands don’t make the butter soft, and to keep a grip on the butter.
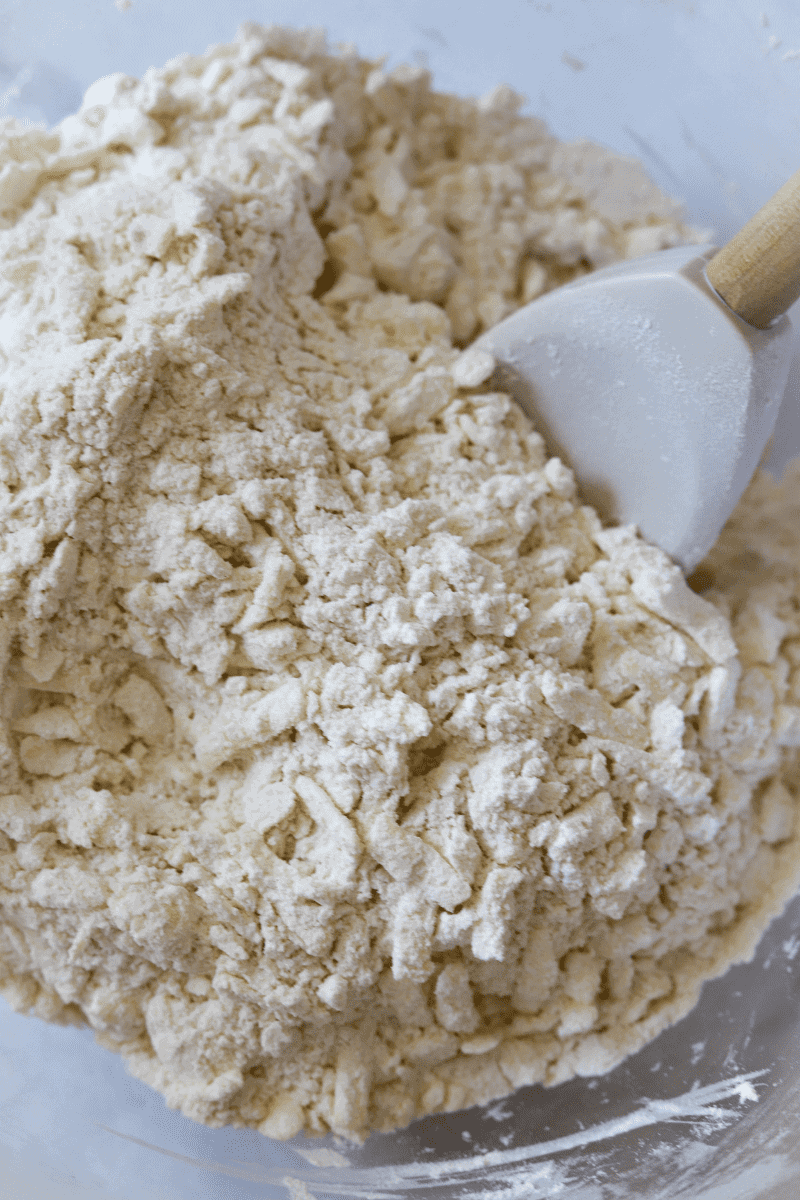
Step 2: Mix the ingredients
Combine the dry ingredients and butter in a mixing bowl using a spatula or wooden spoon. Add a few tablespoons of ice-cold water at a time, and bring the dough together using your hands. The dough should be moist but not wet! Wet dough is very hard to work with and tears easily, so go easy with the water. You can always add more, but you can never add less!
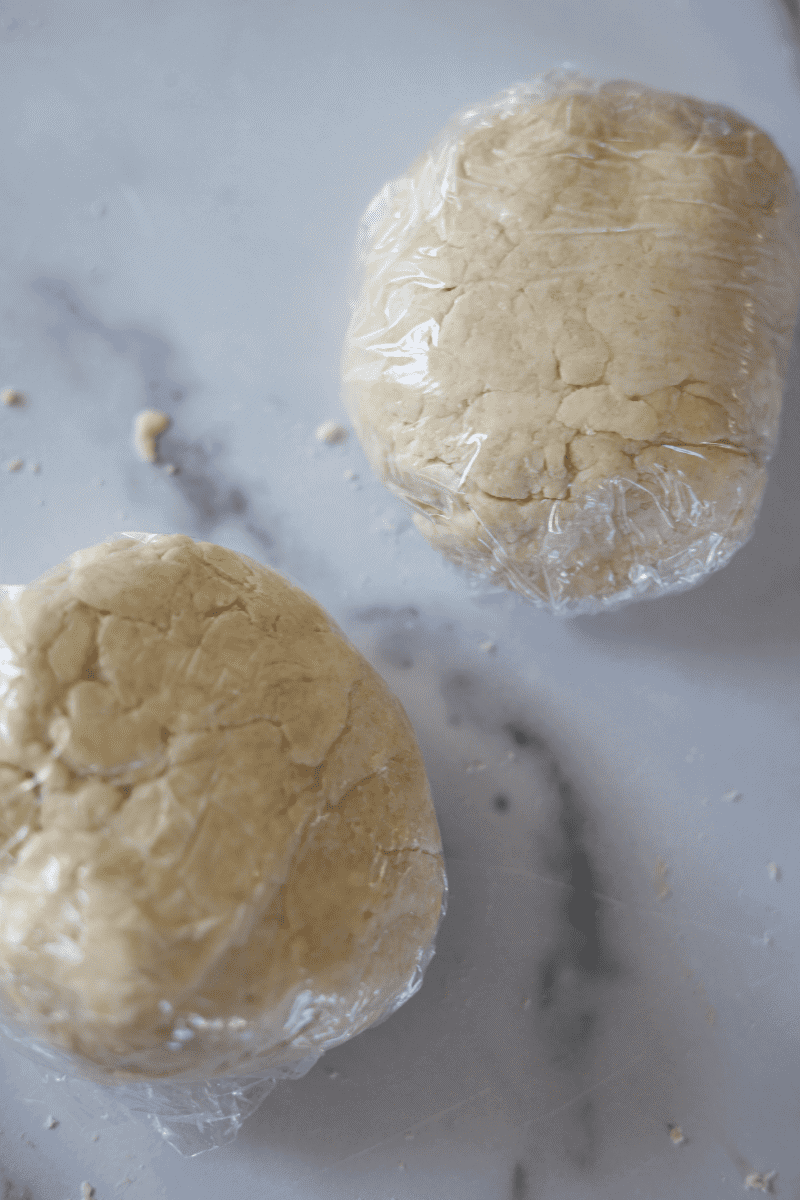
Step 3: Work the dough into a ball
This is when you use your hands. Remember to not overwork the dough. You should only be forming a ball and not kneading the dough! Just a reminder that over-working the dough yields a tough crust!
Once your ball is formed, divide it into 2 parts. Flatten each portion into a round disk and wrap them in plastic wrap.

Step 4: Let your dough rest in the refrigerator for 2 hours
Yes. This part. I recommend a minimum of 2 full hours. Anything shorter, just never seems to work for me. If you don’t chill your dough and let it rest long enough, your all-butter pie crust will shrink in the oven. It’s happened to me plenty of times, and it’s very discouraging.
Just be patient, and let your dough rest. If you have the time and the patience to experiment with shorter resting times, go for it, but I can’t make any promises!
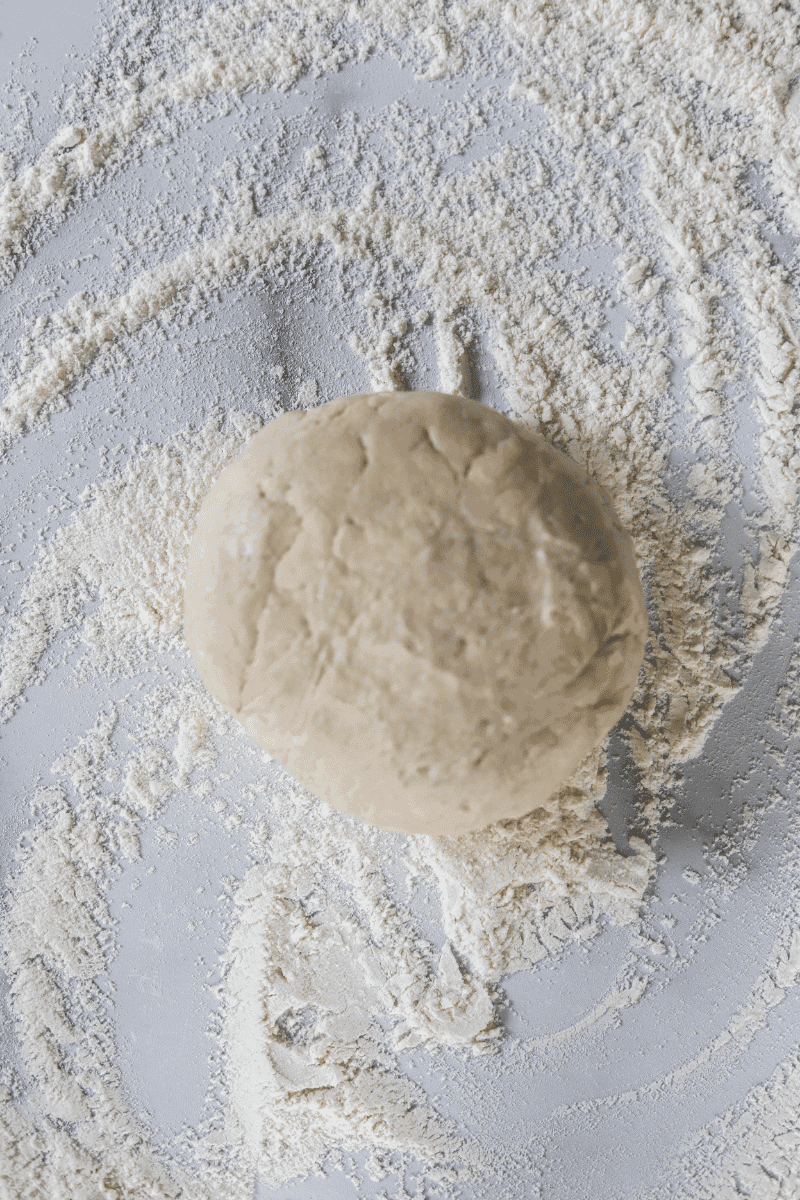
Step 5: Roll out the dough!
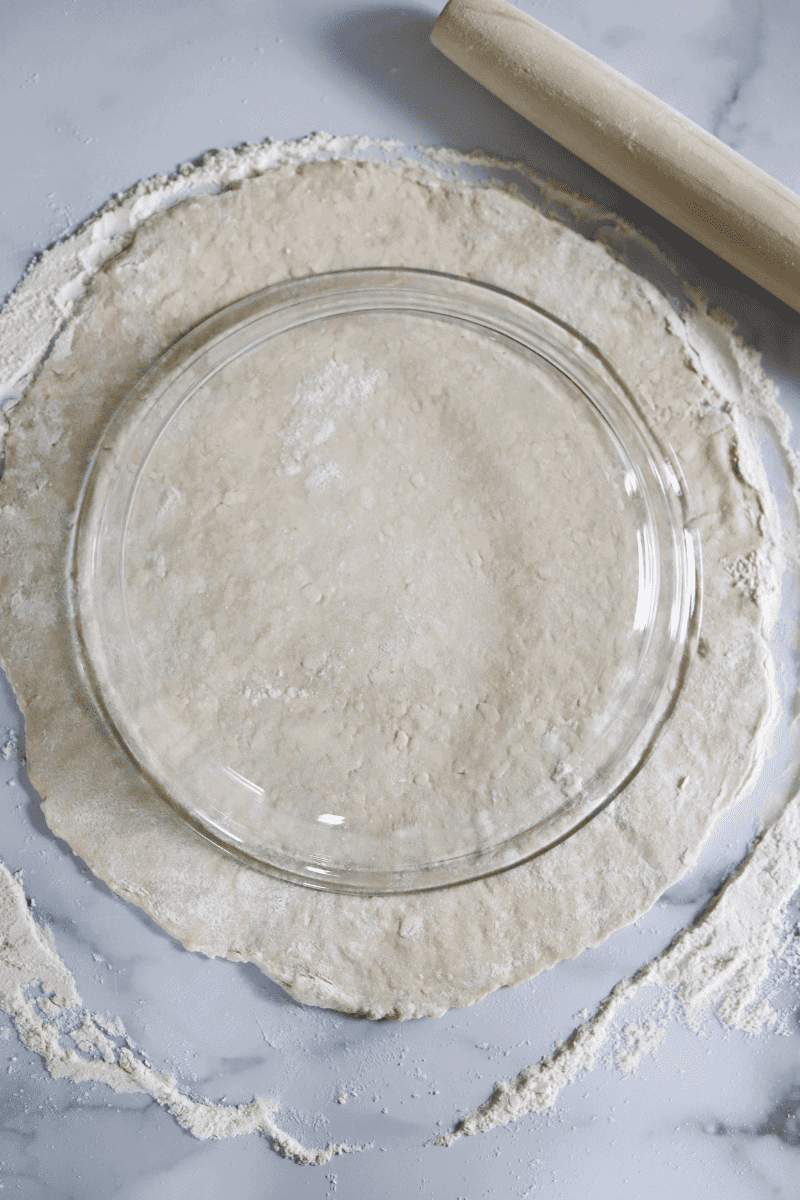
This is my favorite part! Flour your rolling pin and work-surface generously, and roll 1 dough disc into a 13-inch circle. If you don’t want to measure, place pie plate in the center of the dough, and try to eyeball it.
You want to have enough overhang on the sides (I like to have at least 2-3 inches between the rim of the pie plate and the edge of the dough). Remember, your overhang will get shorter once you contour the dough to the pie plate.
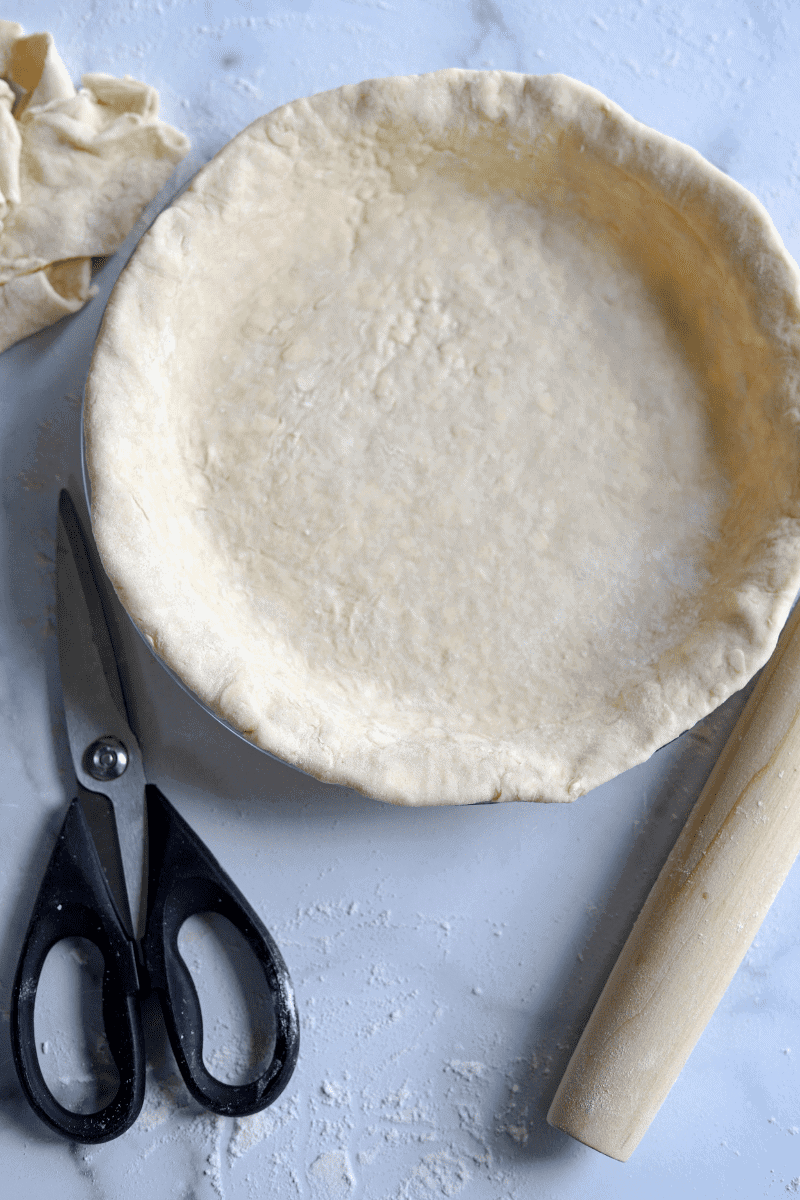
Step 6: Place the dough over the pie plate and trim or tuck the edges.
Loosely roll the dough up using your rolling pin and drape the dough over the pie plate. Gently contour the dough into the pie plate. You can trim the overhang, or fold it under. I prefer to tuck my edges under rather than cut them. I had a lot of overhang in the photo below so I trimmed first, and still had some to tuck under.
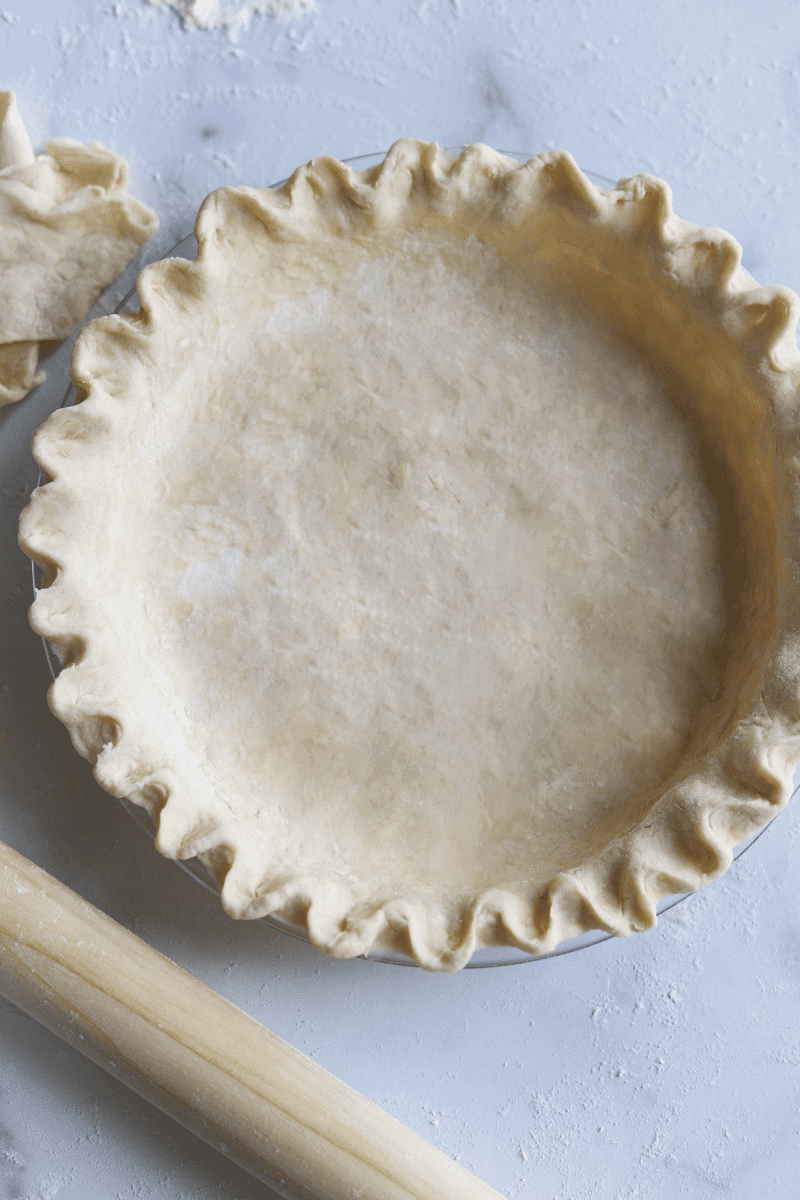
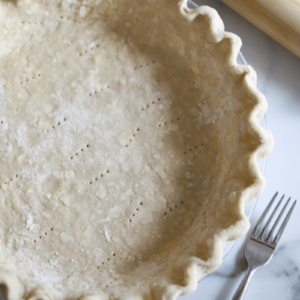
Use your thumb to push the edge of the dough between your other thumb and index finger to create this scalloped edge in the photo below. Repeat along the perimeter of the pie plate. You can also use the tines of a fork to do this if you you’re confused by my directions.
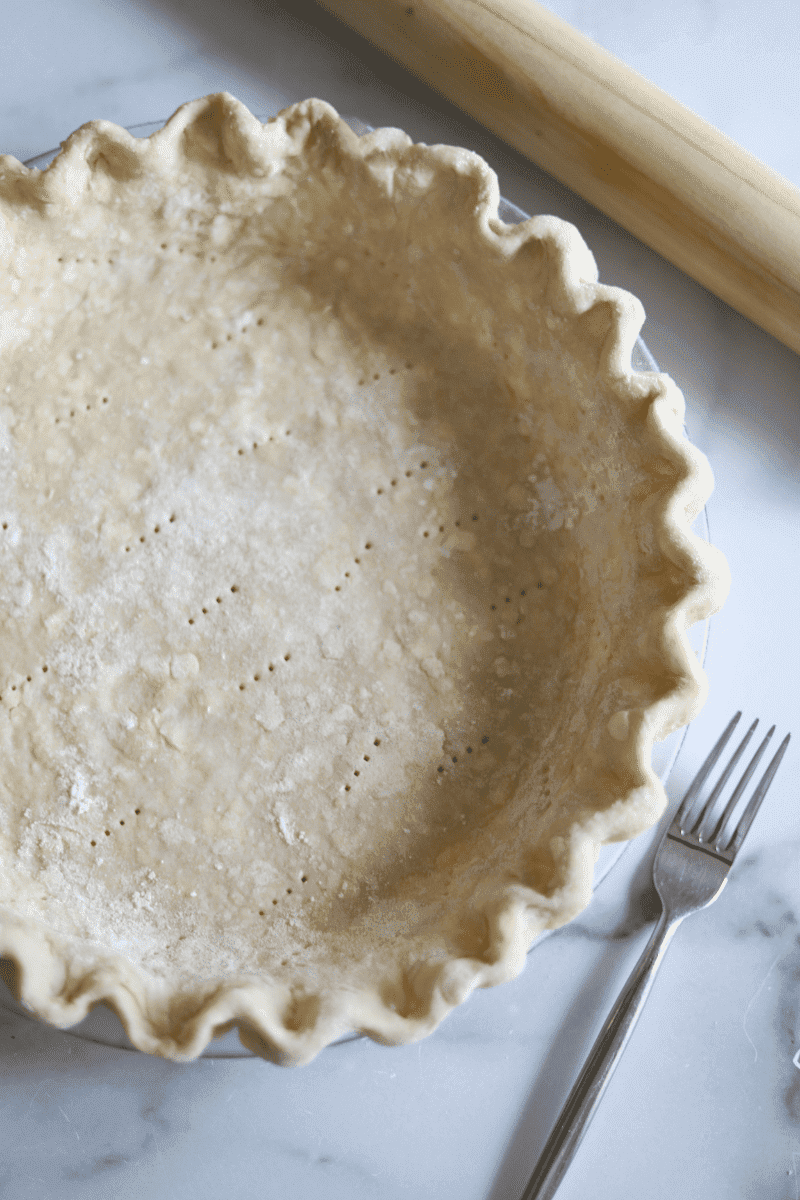
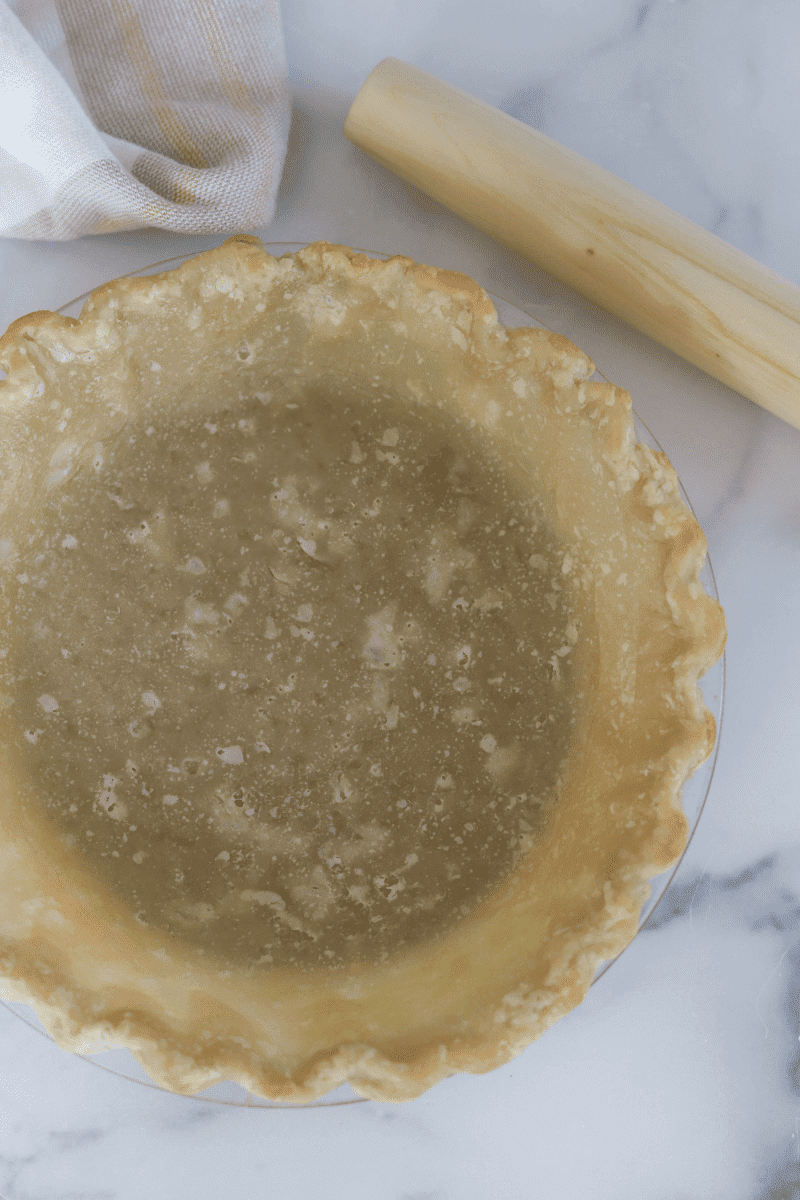
Pierce the bottom and sides of the plate with a fork (this is called docking), chill it in the refrigerator for 1 additional hour and you’re done!
If your pie recipe calls for a double crust, you’ll need to roll the other half of the dough out to top your pie with. Hold off on trimming/tucking and crimping the dough until you’ve added your top crust!
How to Blind-Bake:
If you’re not familiar with this term, blind-baking means partially or fully baking the bottom pie crust prior to adding the pie filling. Depending on your recipe, it’s not always a required step.
No-bake pies require a full blind bake. Custard pies (like pumpkin and sweet potato) sometimes require a partial bake, it depends on the recipe. Some people swear by par-baking the crust so the bottom of the pie doesn’t get soggy while it’s baking. Others actually like the bottom of the crust to be slightly moist, so they don’t par-bake at all. Your pie recipe should give you direction on whether to blind-bake or not.
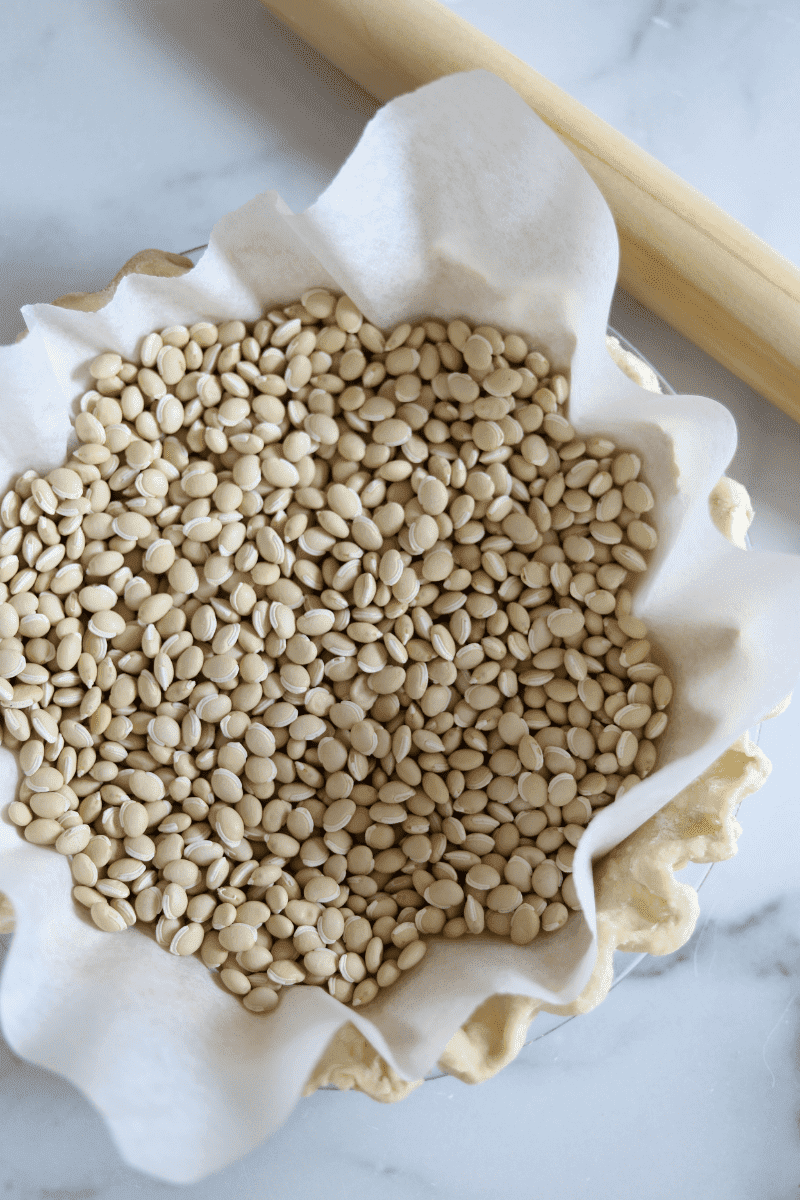
When you blind-bake, it’s important to weigh down the center of the pie crust so it keeps its shape and doesn’t puff up while baking. To do this, place a sheet of parchment paper over the pie crust and fill the center with dried beans or pie weights. I always have dried beans on hand, so that’s what I use.
For a partial blind bake, bake the weighted pie crust for 30 minutes at 375°F. Take the crust out of the oven, remove the pie weights and add your filling. After blind baking, you’ll want to adjust the oven temperature per the instructions in your pie recipe and bake accordingly.
For a full blind-bake, bake the pie crust for 40-50 minutes, remove the pie weights, return the crust to the oven and bake about 5 minutes longer. Your pie crust should be golden brown in color. The bottom of the pie crust may puff up slightly, but the pie should hold its shape. The bottom will go back to normal as it cools. Let the pie crust cool fully before adding a no-bake filling.
A few tips and tricks before you begin:
- Use a 9-inch glass pie plate. Glass is a great conductor of heat, and it helps the crust bake evenly. Glass pie plates are generally inexpensive too.
- Use salted butter for the best flavor! It makes a huge difference! If you prefer not to use salted butter, I would add 1 teaspoon of salt to the recipe for every teaspoon of flour. So for this recipe, you would need 2 and ½ teaspoons of salt.
- Keep your ingredients cold! Even if it means sticking the dough or crust back in the fridge at any point! You also need to be sure to chill your all-butter pie crust for long enough. Make sure to follow the instructions below for the best results.
- Some pie-recipes call for 2 pie crusts and others only call for 1. This crust recipe yields 2 pie crusts. If your pie only requires 1 crust, you can refrigerate the other half for up to 5 days or store it in the freezer and roll it out when you need it.
- Using a pie crust shield helps to keep the edges of your pie crust from getting too crispy. It’s not necessary for blind baking, but it does help when your recipe has a baking time of 45 minutes or longer, or a high baking temperature.
- Egg wash aids with baking and helps to give the pie crust some color. I usually mix a teaspoon of milk with 1 egg and brush it along the edges of the crust, towards the end of baking.
- Remember that butter hardens in the fridge. If you chill your fully prepared pie, the crust will seem hard if you try to slice it right out of the refrigerator. Let your pie sit for 10-20 minutes at room temperature before slicing, to allow the crust to soften!
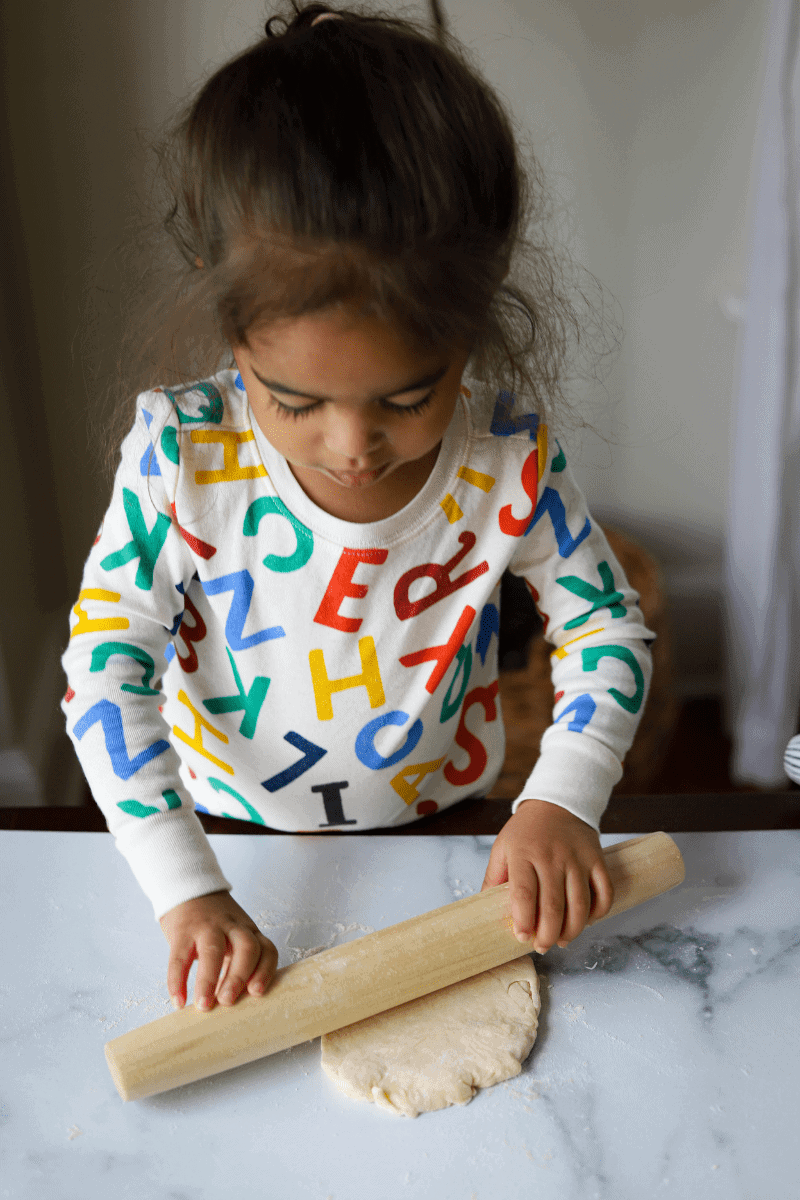
Oh, and an adorable little helper is a must!
Easy All-Butter Pie Crust – with Blind Baking Instructions
Ingredients
- 2 ½ cups of all-purpose flour
- 12 tablespoons of frozen salted butter
- 1 tablespoon of granulated sugar
- 1 teaspoon of salt
- ¾ cup cold water, plus 3 ice cubes
- 1 teaspoon of apple cider vinegar
Instructions
- Combine the water, apple cider vinegar and ice cubes in a glass or spouted measuring cup. Mix and set aside.
- In a large mixing bowl, mix the flour, salt and sugar with a whisk.
- Grate the frozen butter and add it to the dry mixture. Toss with a silicone spatula.
- Adding a few tablespoons of ice water at a time, start to work the dough into a ball using your hands. The dough should be moist enough that it sticks together but wet. Make sure to work quickly and try not to handle the dough too much, as doing so will melt the butter.
- Once you form the dough into a ball, split it into two halves and shape each half into 2 round discs. Wrap each disc in plastic wrap. Refrigerate the dough for 2 hours.
- Once the dough has chilled, unwrap 1 or 2 discs of dough (depending on your recipe) and place it on a generously floured surface. Flour your rolling pin, and roll the dough out (1 disc at a time) into a 13 inch circle. If your recipe only calls for 1 pie crust, you can store the other half in the refrigerator or freezer.
- Once the dough is rolled out, drape it over your rolling pin and lay it over your pie plate. Contour the dough to your pie plate and trim any excess overhang or tuck it under.
- , add your filling, top the pie dish with the second crust, and trim and crimp the edges using your fingers or a fork. Chill the pie in the refrigerator for 1 hour and then bake the pie according to your pie recipe’s instructions.
- , use your fingers to crimp the dough around the perimeter of the pie plate. Pierce the bottom and sides of the dough with a fork (this is called docking) and let your pie shell chill in the refrigerator for 1 hour. Then add your filling and bake according to your pie recipe’s instructions.
- I or if your pie recipe requires a partial-baked pie shell, refer to the blind-baking directions below.
Blind-Bake Directions
- Pre-heat your oven to 375°F
- Using a fork, poke tiny holes in the bottom and sides of the pie crust (this is called docking).
- Place a sheet of parchment paper over the pie crust and use dried beans or pie weights, to weigh the parchment paper down.
- : bake the pie shell for 25-30 minutes. Then remove it from the oven and let it cool for about 5 minutes before you take the pie-weights out. Pour in your filling and proceed with your pie recipe directions.
- bake the pie crust for 40-50 minutes. Allow 5 minutes for the weights/parchment to cool down slightly and then remove them. Return the crust to the oven, let it bake for about 5 minutes longer. Once your pie crust has cooled completely, add your no-bake filling and proceed with with your pie recipe instructions.
Sonya says
First of all, thanks for this! I am always looking for a good butter crust recipe, especially one that works well for blind baking. I just won first place and a ‘special judge’s award’ at my local fair for my lemon meringue pie but the butter crust recipe I used (but had not tried as a blind bake) did not hold up as well as I would have liked and I’m sure the judges just overlooked that. I’m making a quiche tomorrow and this recipe is currently chilling so I’m going to see how it does. I’m thrilled with the discovery of grating frozen butter! So quick and easy! In the time it usually takes me to cut the butter into cubes it was grated and blended and no pastry cutter or sore arms involved! I’ll definitely keep that trick in the repertoire. Thank you!
Also, it looks like you’ve got a couple of typos (I didn’t read it all carefully, but these popped out: 1. “I would add 1 teaspoon of salt to the recipe for every teaspoon of flour.” I thought that would be A LOT of measuring and even more salt but then realized you meant for every CUP of flour 😉 and 2. “The dough should be moist enough that it sticks together but wet.” – missing a “not” before “wet” I’m assuming. Occupational hazard as an English teacher to find the typos, but both could become bigger mistakes to an inexperienced baker.
Looking forward to seeing the results!