
I’m just gonna start off by saying that it took me a long time to get this recipe where it needed to be before I published it! Notice that I skipped a week here and there from posting? Yup, introducing Cape Verdean Cuscuz, she’s to blame! Making cuscuz is an art and a science, and don’t you let anyone tell you otherwise!
First and foremost, I give full credit to mamá (my grandmother) for showing me how to make Cape Verdean cuscuz. I tested and re-photographed this recipe many times because I needed it to be as perfect as hers! I’m show you how to make it in a traditional binde (claypot) because that’s just how Mamá makes it.
What is cuscuz?
I realize that not everyone knows what cuscuz is. Truthfully, Cuscuz is kind of hard to define. Simply put, cuscus is a Cape Verdean breakfast food that’s made mainly of corn flour or mandioca (yucca) flour. The corn version (this one) also contains sugar, cornmeal and mandioca starch (aka manioc or tapioca starch). Most people add a touch of cinnamon. The dry ingredients are moistened with water and steamed in a binde, which as I mentioned, is a traditional Cape Verdean clay pot. Most Cape Verdeans use a flower pot (yes, one that you can find at the Home Depot) and insert it into a large tin can. The seam is sealed with a paste that’s made from the reserved corn flour, and the cuscuz is covered and steamed on the stove top.
The end result is sort of like a cornbread (I’m cringing as I say that because it tastes nothing like the cornbread that we eat in the US), but honestly that’s the closest thing I can compare it to. Feel free to come for me in the comments if you can make a better comparison! As I mentioned, cuscuz can also be made with yucca flour, but that’s an entirely different post for another day.
Cuscuz is typically served with other Cape Verdean breakfast foods like re-heated rice, fried eggs, fried fish, linguica or fried cachupa. Most people make it on the weekends but heat it up for a smaller breakfast during the week with coffee.
Cape Verdean vs. Brazilian Cuscuz
Brazilians have their version of cuscuz. I’ve never had Brazilian cuscuz, but from what I’ve seen online, they have a version that is very similar. Brazilian cuscuz is also steamed, although I’m not sure if a claypot is traditionally used in Brazil. They use something called a cuscuzeira, which is a modernized pan used to make cuscuz. Cuscuzeiras can be tricky to find for sale in the U.S. but I was able to find one online. (I’ve never used it, by the way).
Should I use a binde or a cuscuzeira?
This is your choice, but traditionally Cape Verdean cuscuz is made in a binde (clay pot). In Cape Verde, the binde has more of a dome shape and has more than one hole in the bottom. In the U.S., I’ve only seen unglazed terra cotta flower pots used as bindes. This substitution likely came from the fact that the traditional Cape Verdean binde is not sold in the U.S.
The binde is placed on top of a metal canister (usually a large emptied out metal can) that’s filled ⅓ of the way up with water. Paste made from the cuscus flour is used to seal the seam where the the binde meets the can. This seal keeps the steam in the binde.
If you’re not up for the challenge of assembling a binde/metal can device, you can opt to use a cuscuzeira. Just keep in mind that a cuscuzeira is much smaller than the binde used in this recipe. I believe it’s roughly half the size, so you’ll need to scale the recipe down.
Mamá swears the binde yields better tasting cuscuz. As I’ve mentioned, I haven’t used my cuscuzeira yet to make the comparison, but I’m taking Mamá’s word for it!
Disclaimer time! As you know, flower pots are not designed for cooking. I’ve been eating Cape Verdean cuscuz made in a flower pot my entire life, but I cannot attest to its safety. Some sources say that unglazed terra cotta is safe for eating, but I haven’t conducted any other research to confirm that. If you have concerns related to food safety, using a cuscuzeira is your best bet.
List of Ingredients:
- Yellow corn flour is the main ingredient and can be tricky to find. I’ve had luck finding it in Portuguese and Latin markets though.
- Yellow pre-cooked cornmeal is commonly labeled ‘masa harina’. You’ll only need about a cup. It helps give the cuscuz structure.
- Tapioca starch comes from the yucca plant. Tapioca starch is also labeled as tapioca flour, or manioc starch. This recipe only calls for a few tablespoons, but it’s an important binding agent, so you’ll need it.
- Granulated sugar adds sweetness, but don’t over-do it or Mamá will talk about you!
- Cinnamon is added to enhance the flavor. I use 1 tablespoon, some people use more and some don’t use any.
- Water is an important ingredient because it holds everything together. I use anywhere from 2 and ½ to 3 cups of water (added a little bit a time). I explain my theory on when to use 2 and ½ cups versus 3 cups in step 2.
- Cooking spray is optional but recommended if you want picture-perfect cuscus. I find that when I grease the pot with butter, it sticks to the binde a little. You can use butter in place of spray, or you can use both!
- Salted butter is preferred to serve with cuscuz. There’s no salt in the recipe itself, so the salted better gives the cuscus a nice taste.
Tools you’ll need:
- Your hands! The ingredients are combined using your hands, no whisk or spatula is needed.
- A very large bowl. I’m not exaggerating, a 30-inch steel mixing bowl is ideal. You’ll be mixing a lot of flour with your hands so it’s gonna get messy. If you think you’re gonna be making cuscus regularly, invest in a large steel mixing bowl. I store mine in my basement when it’s not being used, since it won’t fit in any of my cabinets.
- A mesh strainer is used to sift the ingredients into the binde. You need this!
- A clay pot. Make sure you read my disclaimer regarding food-safety above. I bought my flower pot at Ace Hardware for like 5 bucks. You’ll need one with a hole in the bottom and preferably no grooves on the inside. Also, make sure it’s an unglazed terra cotta pot.
- Parchment paper or a coffee filter to cover the hole at the bottom of the binde.
- An empty 28 ounce metal can. I repurposed a large coffee can. My can won’t last forever but I can easily buy another one.
- Foil and a glass lid to cover the cuscuz while it’s steaming.
- Cuscuzeira: this is a modernized aluminum cuscuz pan. If you have one of these, you don’t need the flower pot, metal can, foil or glass lid. Cuscuzeiras come with their own lid. Remember you’ll need to adjust the recipe since a cuscuzeira is smaller than the binde used in this recipe
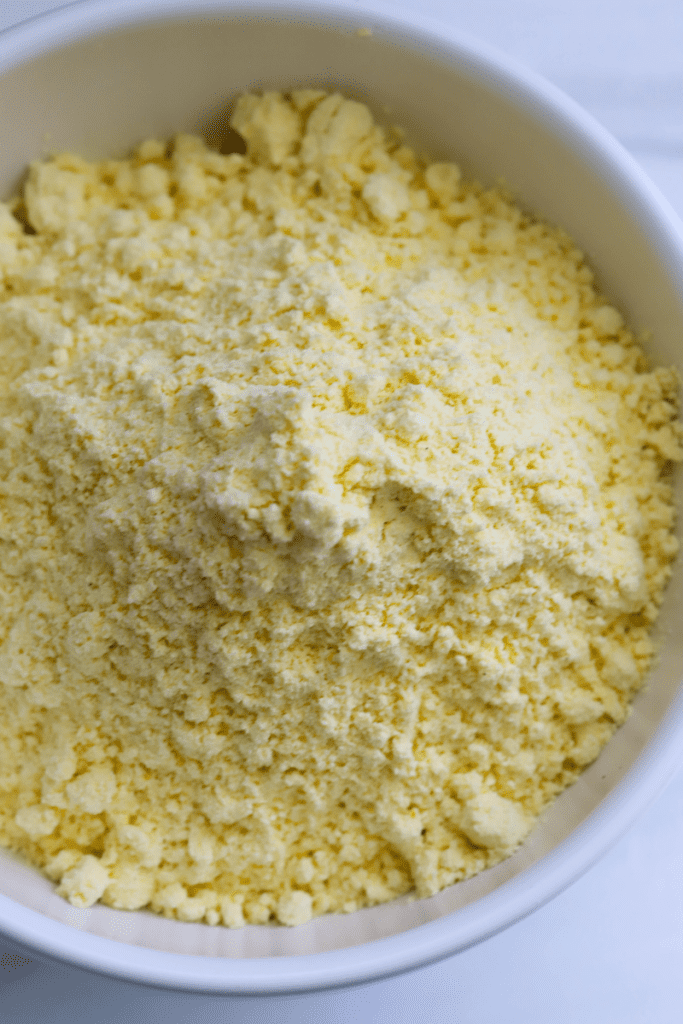
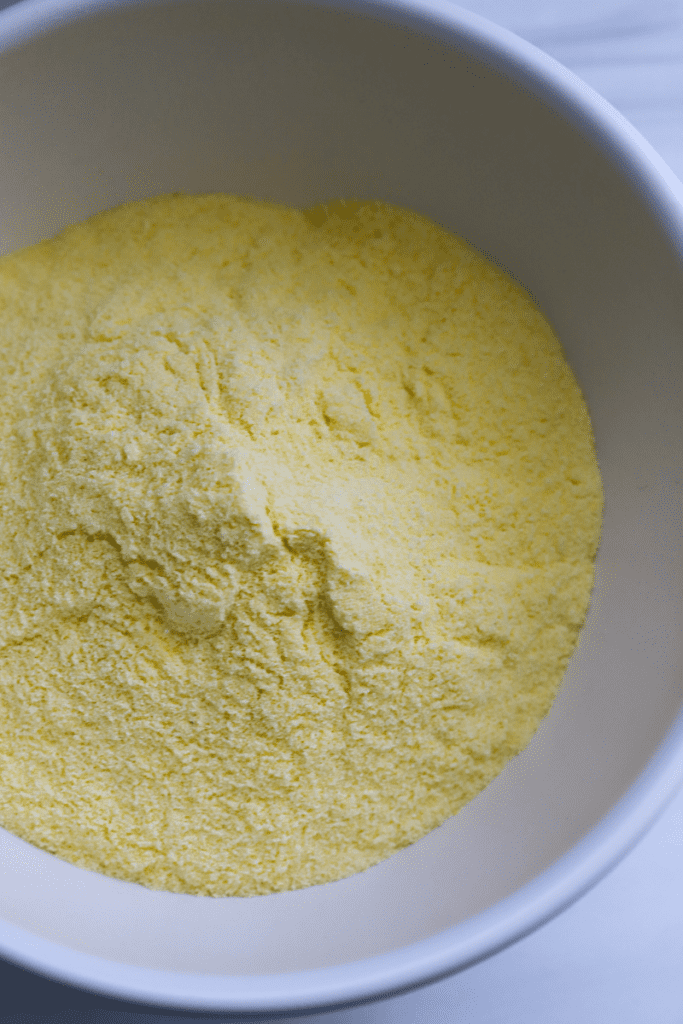
Step 1: Combine the flour, cornmeal and starch
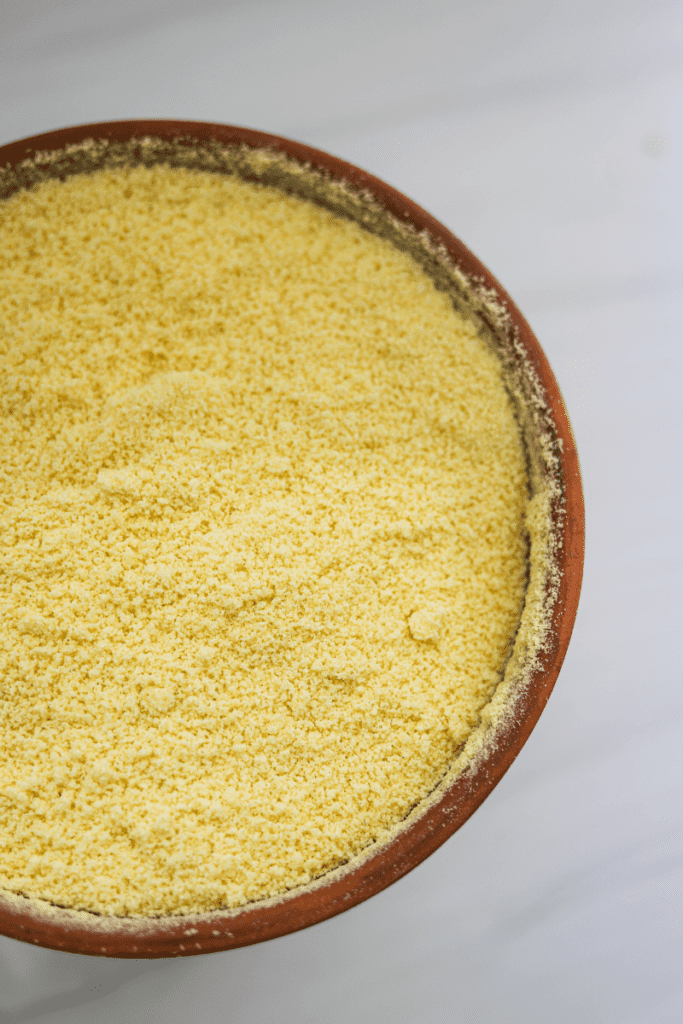
Using the largest mixing bowl that you can find, combine the flour, cornmeal and tapioca starch using your hands. The mixture will feel very soft and silky. Take a few minutes to mix the ingredients thoroughly. Set ⅓ of a cup of this mixture aside. You’ll need it to make paste to seal the binde later.

Yellow corn flour Fine pre-cooked cornmeal Flour, cornmeal and tapioca starch
Step 2: Add water
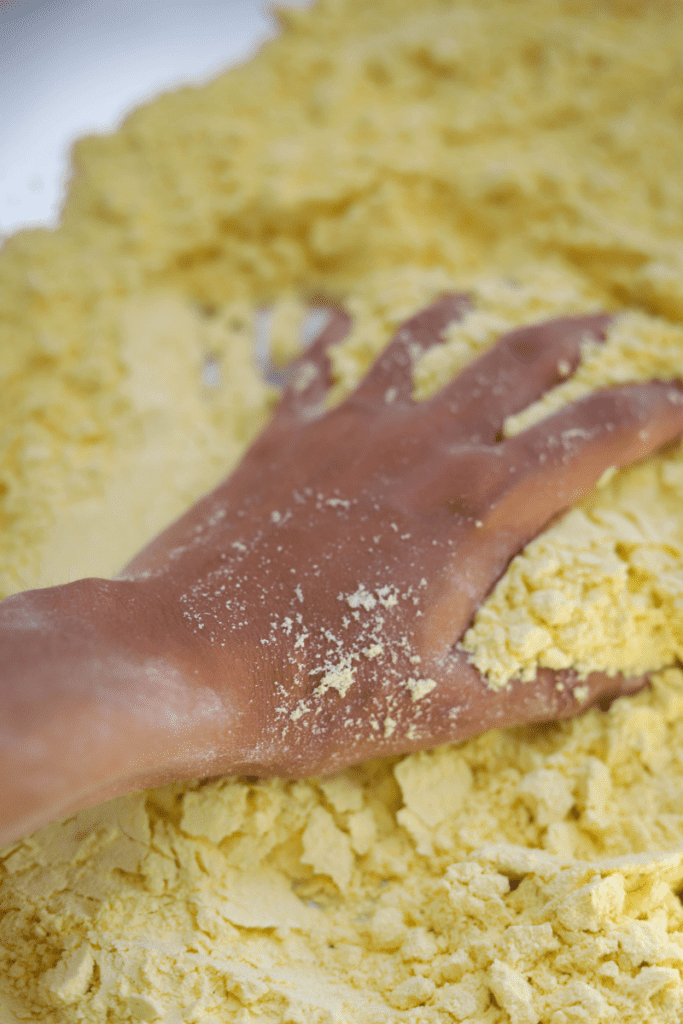
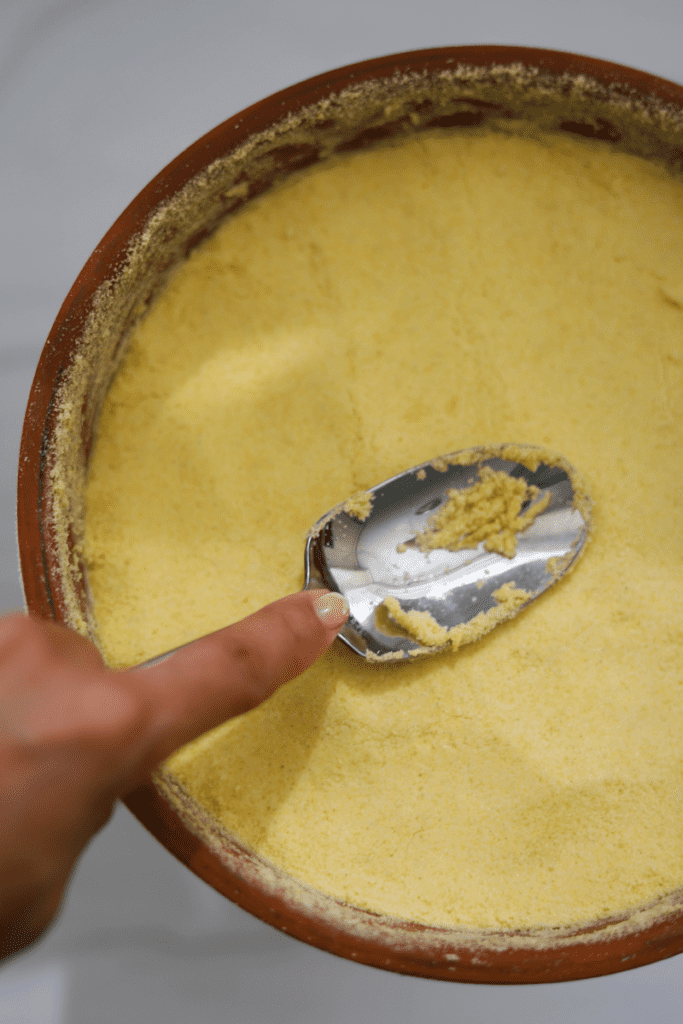
This recipe calls for 2 and ½ to 3 cups of water. You can use cold or room temperature water. It doesn’t need to be freezing, right from the faucet is fine. Add the water to the flour mixture, just a little at a time, and continue to mix with your hands.
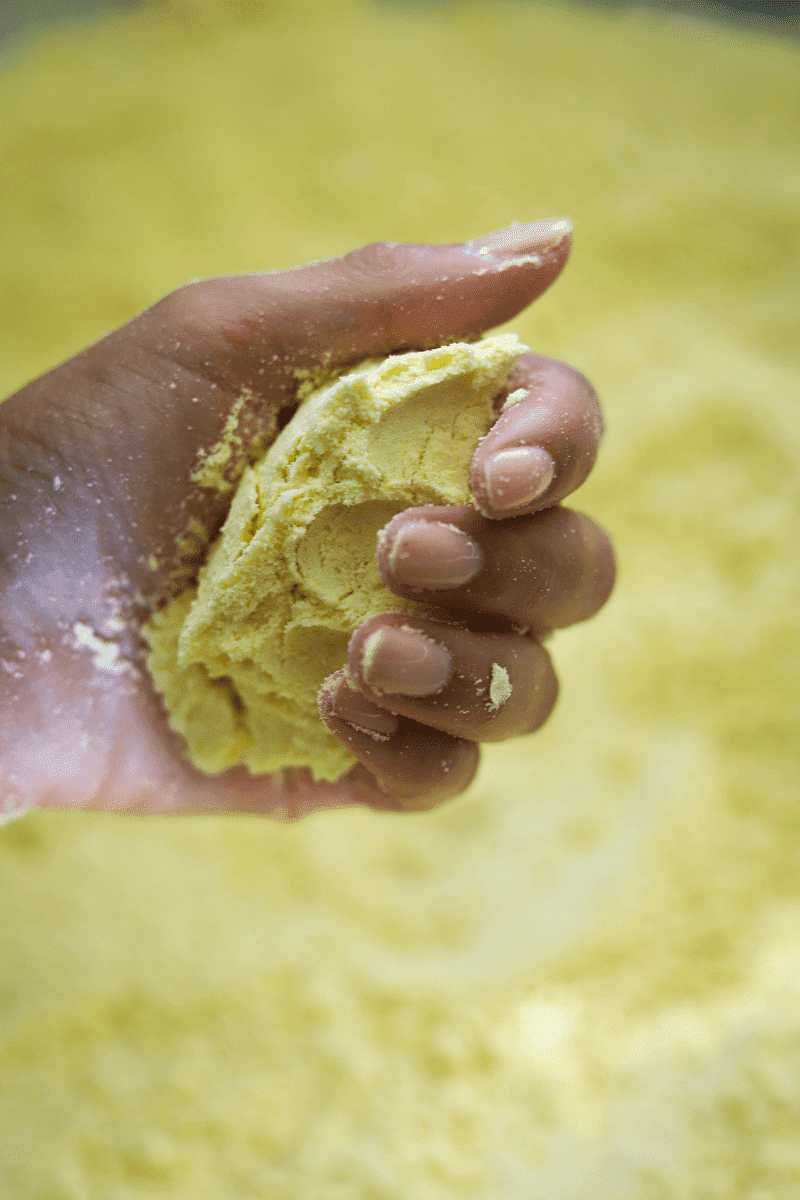
The flour should feel moist but not wet. You’ll know it’s moist enough when it holds together when you squeeze it in your fist. If the flour falls apart easily when you unclench your fist, it’s not moist enough. I have this crazy theory that slightly less water is needed when the air is humid, so in the summer I use 2 and ½ cups, but in the fall and winter months I use 3.
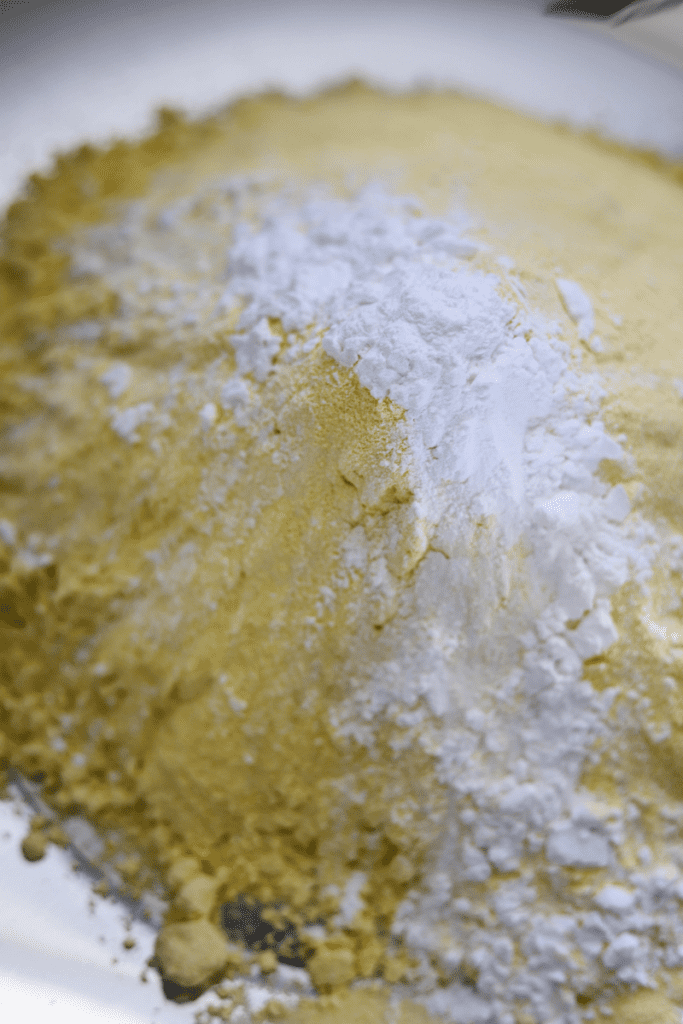
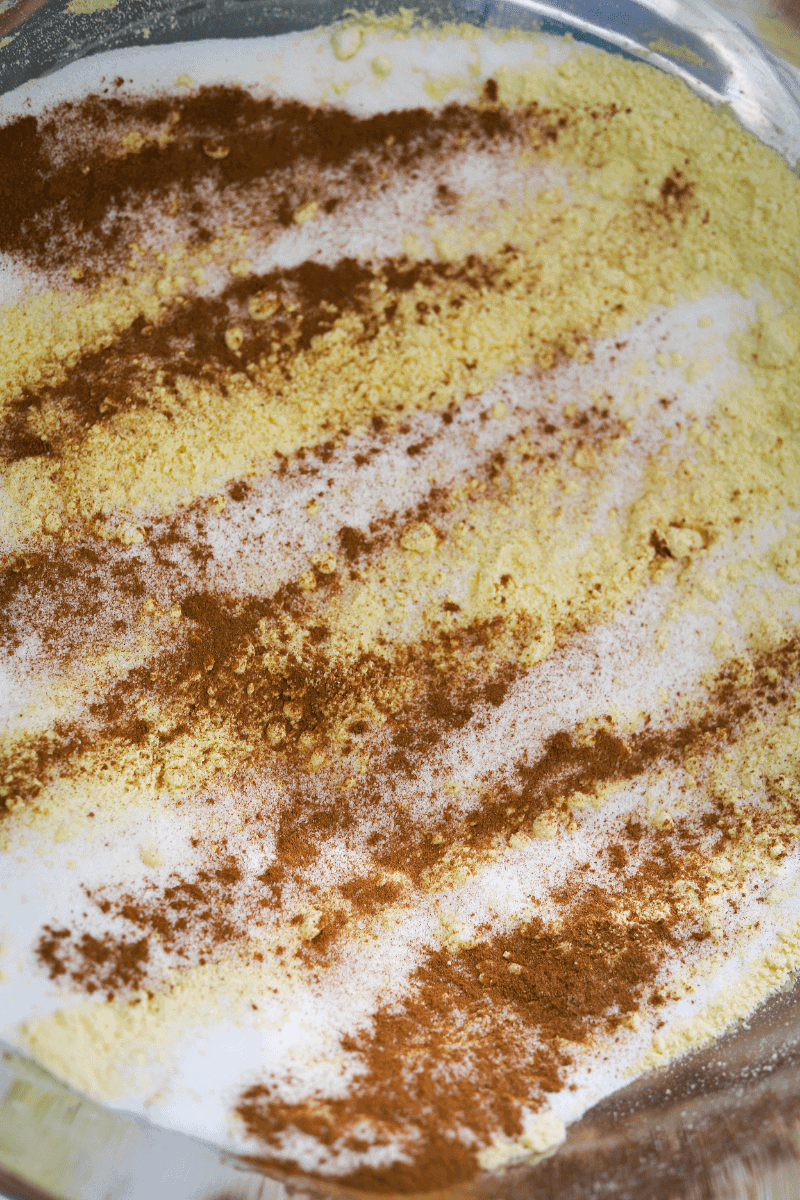
Step 4: Add sugar and cinnamon
Generally I use 1 and ½ cups of sugar and 1 tablespoon of cinnamon. Feel free to use a little more or a little less to suit your taste. Add the cinnamon and sugar to the moistened flour and mix again with your hands. I don’t add the sugar and cinnamon before the water because I don’t want it to get sticky or muddy.
Step 5: Fill the pot
I use cooking spray to grease the binde. Some people prefer butter and that’s fine, but I use spray because I think it’s a better non-stick agent. I also cut a small round piece of parchment and place it at the bottom of the pot to cover the hole. You can use a coffee filter but I find that the parchment doesn’t leave as much of an imprint. Remember, I photograph my food!
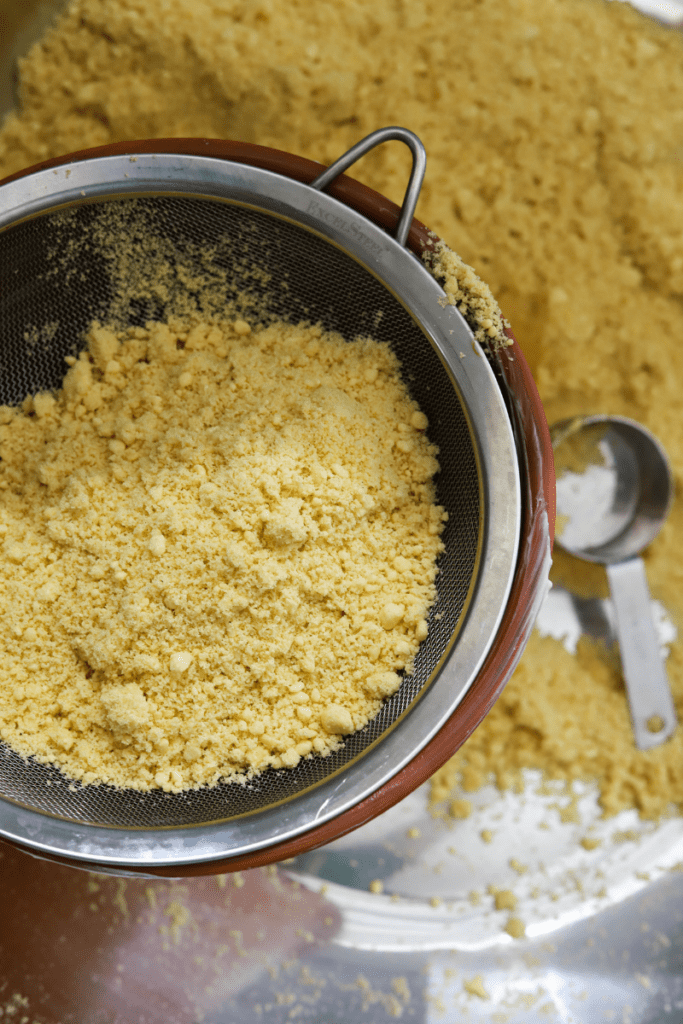
To sift the flour, I put the clay pot right in the steel bowl. Sifting the flour gets messy so I like to have something to catch it in. Use your mesh strainer to sift the mixture into the binde. Use your hands to rub the mixture against the mesh basket. You’ll need to apply a little pressure to press the moistened flour through the strainer basket. You’ll notice that the flour will start to accumulate on the underside of the basket. Tap your hand against the strainer to release the flour as it accumulates.
Do not pack the flour or press it down when you’re filling the binde! I know it can be tempting to do this! If you do this, the cuscuz will become too dense and the steam won’t penetrate. If the steam can’t penetrate, you’ll end up with dry, or worse, broken cuscuz.
Once the binde is full, you can use the back of a spoon to press the top layer down very gently.
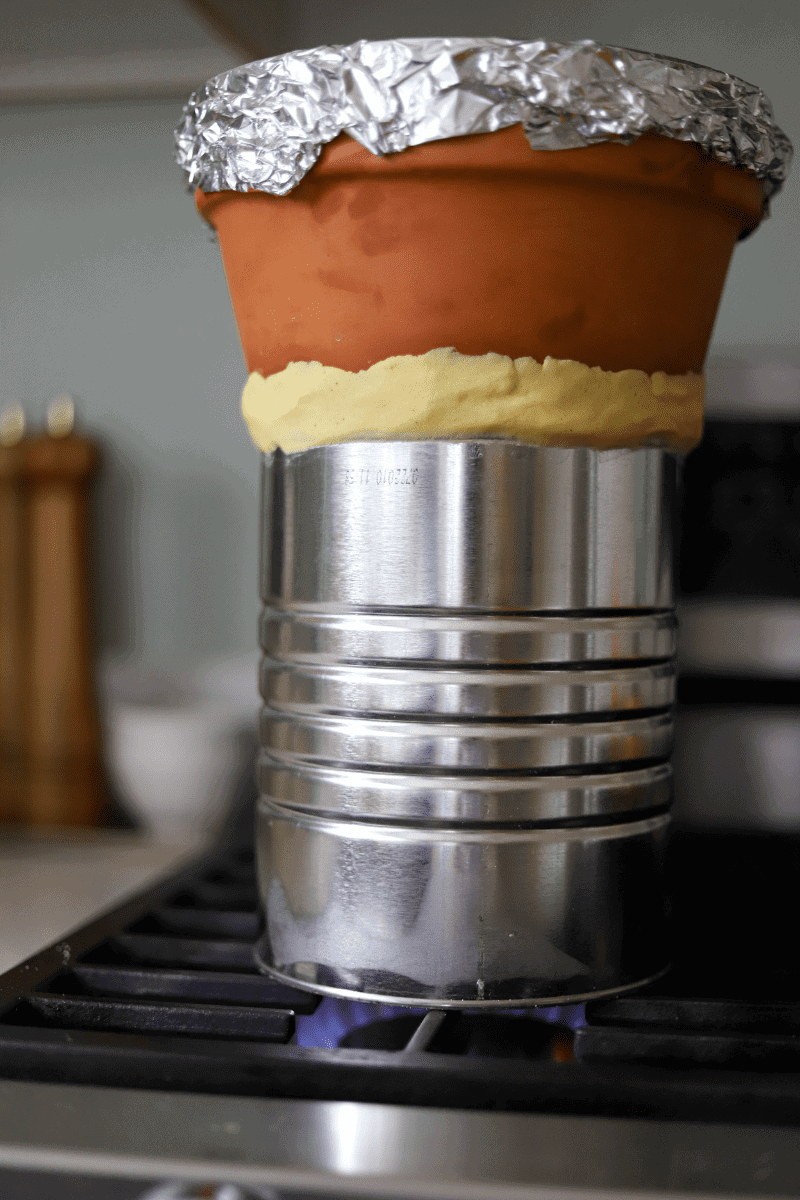
Step 6: Assemble the binde
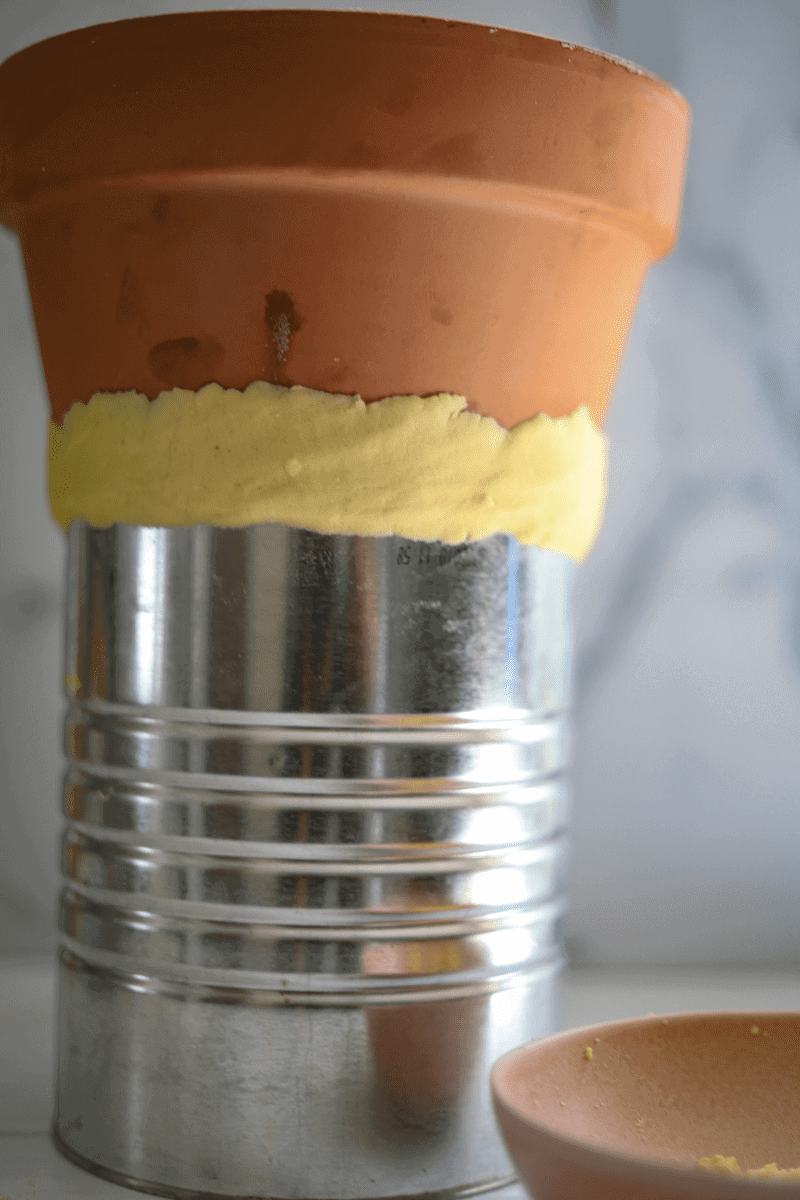
Assembling the binde is simple. You’re just going to fill the metal can about ⅓ of the way with tap water and place the clay pot into the can. You shouldn’t have to worry about the bottom of the pot touching the water because of the way that the pot is shaped.

Add a few tablespoons of water to the flour that you reserved earlier, and use your fingers to make a paste. Press the paste against the seam where the can and the binde meet. You want to seal this off to ensure that the steam doesn’t escape while the cuscus is cooking. The paste should go around the circumference of the binde, as shown in the photo below.
Step 7: Cover and steam
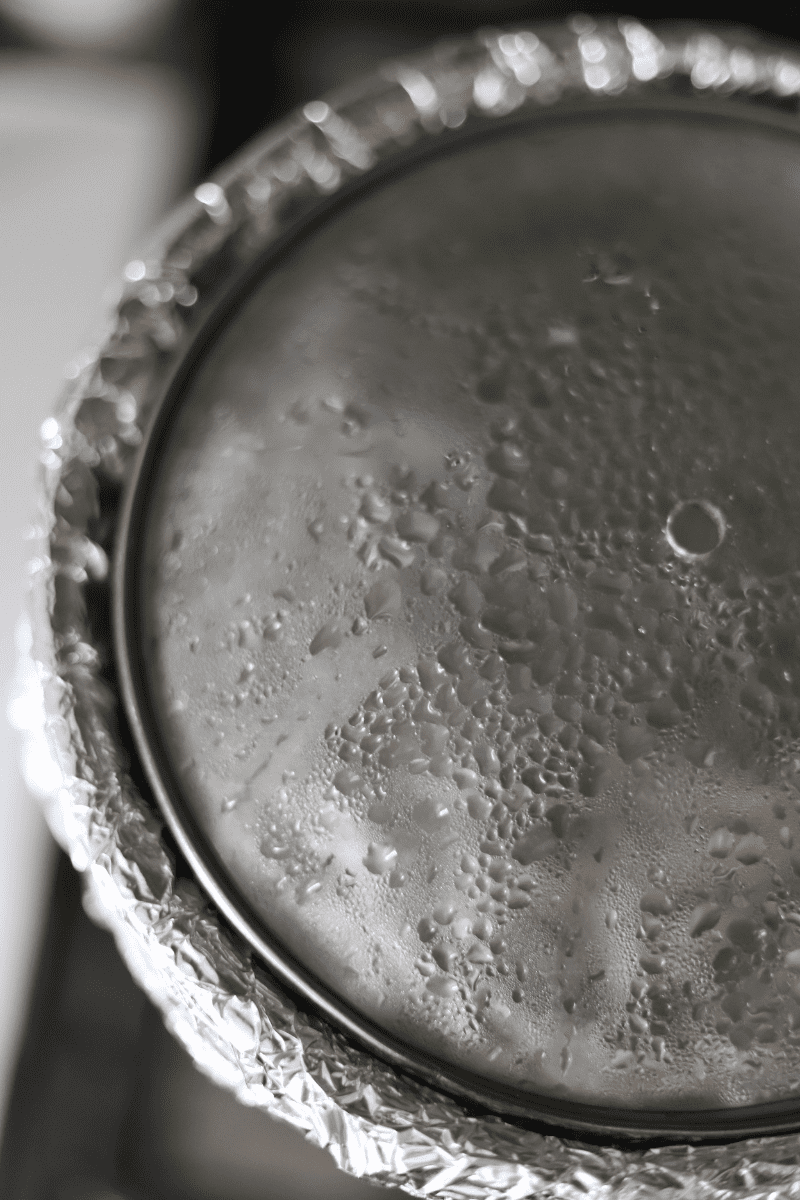
Use foil to cover the top of the binde. Poke holes in the foil to allow the steam to escape. Place a glass lid over the foil and steam the cuscuz over medium heat for about 40 minutes.
Condensation will start to build on the inside of the lid around the 20-30 minute mark. If you notice the condensation sooner, that’s ok. After 40 minutes, you should be able to smell the cuscus. It will have a sweet smell.
Turn the flame off and let the binde cool to the touch. You’ll need to remove the paste from the seam and you don’t want to do this while the binde is still hot.
Step 8: Release the cuscuz and serve
After the binde has cooled down and you’ve taken the paste off, carefully remove the pot from the can and take off the foil and lid. Be careful! The water inside the pot is still hot!
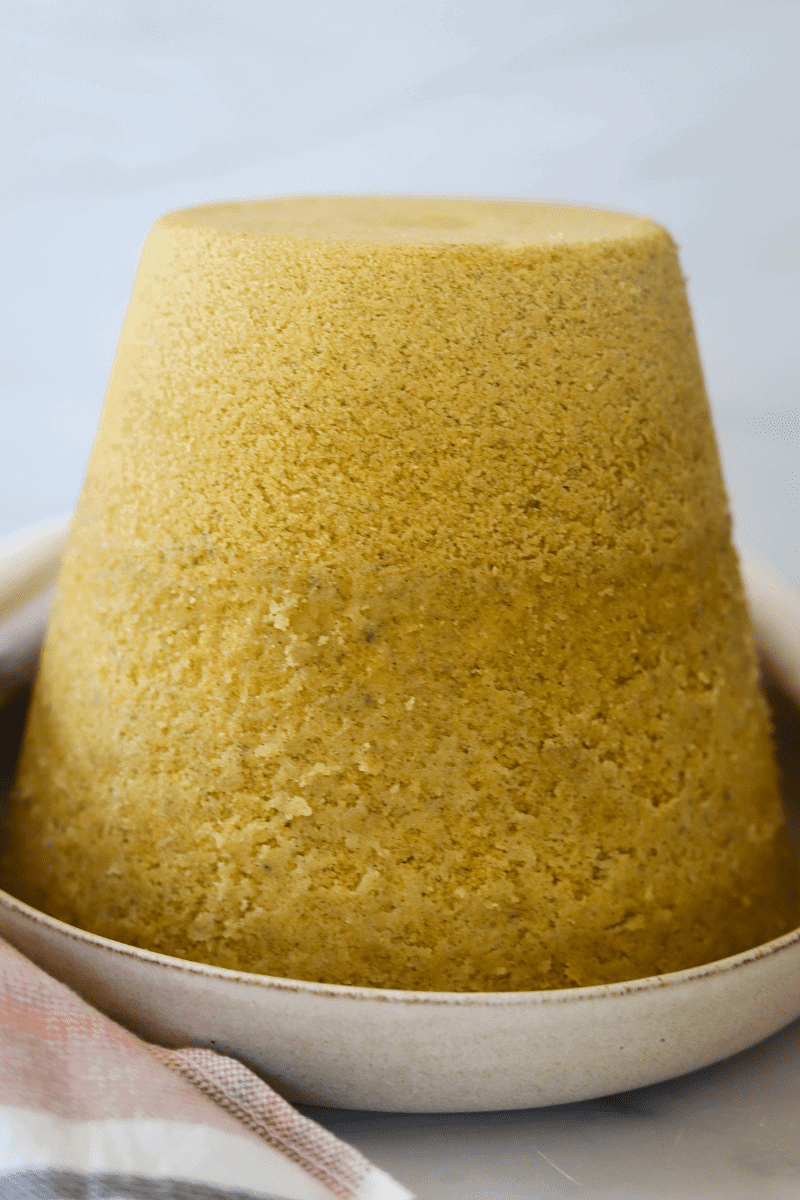
You can run a butter knife along the inside of the binde to release the cuscuz from the sides, but you may not need to. Place a large plate over the top of the binde and invert the cuscuz. You can knock on the sides and top of the binde if you want to, but the cuscuz should release on its own.
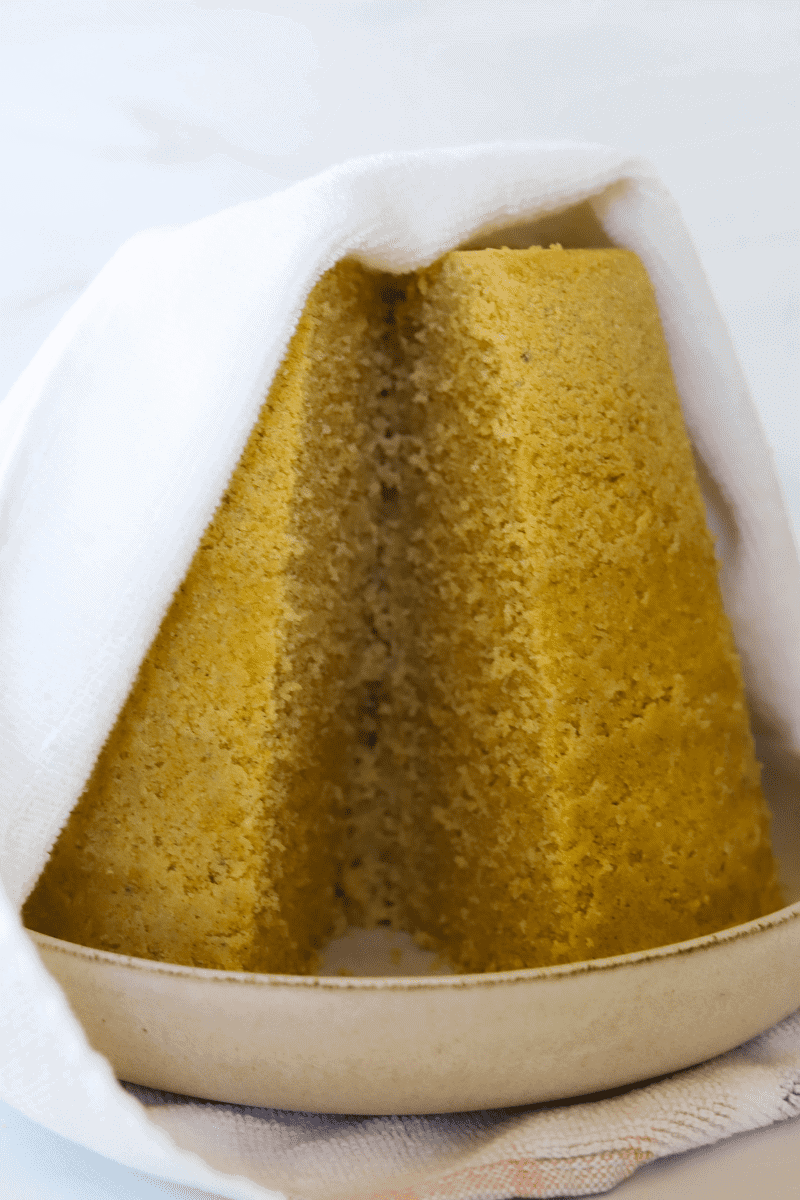
You’ll hear when the cuscuz is released because it’s heavy! Lift up the binde and cover the cuscuz with a kitchen towel until you’re ready to serve it. We keep our cuscuz covered on the breakfast table so it doesn’t dry out. We only uncover it to cut a slice.
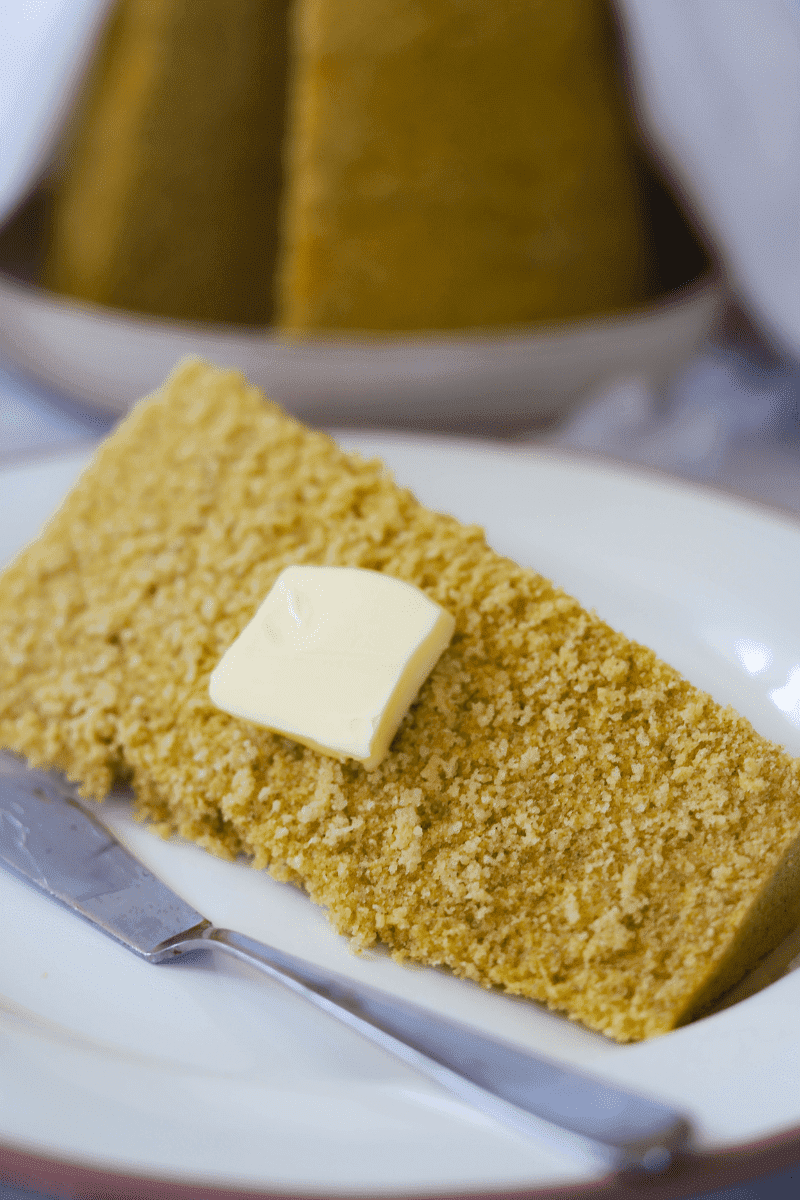
Slice the cuscuz with a sharp knife and serve it with salted butter!
I was being very modest with the butter in this photo! I normally use way more butter than what’s pictured below.
Cuscuz serving and storing tips:
- Serve Cape Verdean cuscuz with softened butter! Softened butter is way easier to spread. Normally Mamá serves it with spread (aka fake butter). I’m not gonna pretend that I didn’t grow up on spread! As long as it’s salted, spreads easily, and tastes like butter, you’re good! What’s good enough for Mamá is good enough for me!
- Keep a kitchen towel draped over the cuscuz while serving. To prevent it from drying out, only uncover it to take a slice, and then cover it back up again.
- Use a large sharp knife to slice your cuscuz.
- Wrap any leftover cuscus in foil and store it in the refrigerator. Seriously, this part. Cuscuz is very dense and surprisingly holds a lot of moisture! It will get moldy if you store it at room temperature in a plastic container. You don’t want to see what moldy cuscuz looks like!
- Leftover cuscus can be heated up in a steamer. I think I actually like it better on the second day. The second steaming makes it so soft and moist!
- Leftovers will keep in the refrigerator for 3-4 days
- Finally, switch it up! Although butter is my favorite topping, you can serve it with papaya jam, sweetened condensed milk or honey. Some people eat it with milk and sugar in a bowl!
Want to try some other Cape Verdean recipes?
Cachupa: Traditional Dish of Cape Verde – Full Recipe
Canja de Galinha – Cape Verdean Chicken Soup Recipe
Cape Verdean Pastel – Pastel de Atum
Pudim de Leite – Cape Verdean Style Flan
Traditional Cape Verdean Cuscuz
Ingredients
- 32 ounce bag of yellow corn flour
- 1 cup pre-cooked yellow cornmeal (this is labeled as )
- 2 tablespoons tapioca starch (also known as manioc starch or tapioca flour)
- 1 cup of granulated sugar (can use less if desired)
- 2-3 cups of room temperature water
- 1-2 tablespoons 1-2 tablespoons of cinnamon
- Cooking spray or a few tablespoons of salted butter for greasing the binde
- Salted butter, softened for serving
Instructions
- Empty the bag of flour into the large metal bowl. Add the cornmeal, and tapioca starch, and combine them with your hands.
- Add ¼ cup of water at a time and use it to moisten the flour mixture. I usually end up using 2 and ½ cups to 3 full cups. Take a handful of the flour mixture and make a fist to squeeze it in the palm of your hand. If it sticks together without falling apart, that means you have enough water. If the flour mixture is powdery or falls apart when you unclench your fist, you need more water.
- Add the sugar and cinnamon and continue to mix using your hands.
- Grease the inside of the binde (clay pot) with a coat of cooking spray or 1-2 tablespoons of softened butter.
- Use a small piece of parchment paper (a coffee filter also works well) to cover the hole at the bottom of the binde. Using a mesh strainer, sift the flour mixture into the binde. Don’t pack the flour down!
- Once the pot is full, use the flat edge of a spoon to gently press the top of the cuscuz down. Cover the large opening of the binde with foil, poke a few holes in the foil and cover the pot with a glass lid. Set aside.
- Fill the large can about ⅓ of the way with water from the sink. Place the can on the stove and put the binde in the can. Combine the reserved flour with a few tablespoons of water and use your fingers to make a thick paste. Use the paste to seal the seam between where the can and the binde meet. Make sure you seal the entire circumference of can.
- Steam the cuscuz over a medium flame for about 40 minutes. You should be able to smell the cuscuz when it’s done, and condensation will build up on the inside of the lid.
- Once the cuscuz is done steaming, turn the flame off and let the binde sit until it’s cool enough to touch. Use a metal spoon to chip the hardened paste off of the binde. Carefully remove the binde from the can.
- Uncover the binde. If needed, run a butter knife along the edges of the cusuz and place a dish over the opening of the binde and invert it. Lit it sit for 2-3 minutes. You can knock on the top and sides of the binde to help release the cuscuz. Lift the binde slowly and the cuscuz should come out easily.
- Slice the cuscuz lengthwise and serve immediately with softened butter. Cover the cuscuz with a dish towel while it’s being served. To store it, wrap each slice in foil and store it in the refrigerator for 3-4 days.
Tamara says
I love the cooking method used for this recipe, so unique and authentic. I can’t wait to give it a try, thanks for the pointers on picking out the pot.
C. Michele says
Thanks Tamara! I really hope you enjoy it!
Renia says
This recipe is filled with so much love, history, and tradition. All of which you can taste in the cuscus.
C. Michele says
Renia, thank you! This dish is so special to me!
Luisa says
Thanks to Crystal for posting this recipe! It teaches you step by step how to make cuscus. My parents are from Fogo and I did not learn how to make cuscus, but I feel I will make it this time.
C. Michele says
Luisa, I am so happy that this recipe makes you want to learn to make cuscus! It definitely takes practice for sure, but you will get it! Good luck!
Robin says
There is nothing better than a mother’s guidance in the kitchen! I felt the love reading about your culture and cuscus.
C. Michele says
Thank you so much! You are absolutely right! I would not have gotten it right if it weren’t for Mama!
Barry J. says
I love how you walk us step by step in making the recipe! It’s very complex, but you break it down perfectly. I’m going to try to make this sometime this winter!
C. Michele says
Barry, I hope you enjoy it! Let me know how you make out!
Adri Ruff says
I learned SO much reading and making this. I won’t lie, I was worried lol – it seemed like it would be way too difficult for me to pull off. But, you explained everything perfectly!
C. Michele says
Adri! Yes! It’s a very intimidating dish for sure! Kudos to you for being brave and trying it out!
Samantha says
I love how detailed and informative this recipe is! I love learning about various types of African cuisines.
C. Michele says
Thank you! African cuisine is amazing! It’s the base of so many cuisines!
Chenée says
I love how well you explain everything in this recipe! This was my first time making cuscus but it came out SO good!
C. Michele says
I am so glad you enjoyed it and had success with the recipe Chenee! Thank you for trying it!
Carita says
WOW! So impressed by the beauty in this cuscus. I love reading about culturally inspired foods and can’t wait to take a stab at this!
C. Michele says
Hey Carita! Let me know how it goes when you make it!
Britney says
Thank you for this wonderful recipe! I had never heard of this dish prior to finding your blog and am so glad that I gave it a try. It was so delicious and my family LOVED it!
C. Michele says
Yay Britney! A win! I’m so glad you and your family enjoyed!
Desirée says
So glad I tried this recipe! Turned out really well!
C. Michele says
Thank you! I’m so happy to hear that!
Capri says
I learned something new after reading your post && made something new in the kitchen. Thanks for your detailed steps! The Cuscus turned out amazing!
C. Michele says
Thanks! Im glad you found the recipe easy to follow! I always worry about being too wordy!
Chef Mireille says
WOW thanks you so much for the pains in getting this traditional recipe to us. Your step by step photos were so helpful in being able to recreate this delicious recipe.
C. Michele says
Thank you Chef! Really the best way to describe it is with photos! I’m glad you had success with it!
Jazz says
Making this cuscus was such a cool experience. Thank you for sharing this–I had never heard of or tried it before finding your recipe!
C. Michele says
Jazz, I’m so glad you enjoyed the experience of making cuscus! I hope you enjoyed!
Marta says
I’m so obsessed with this!! I have never heard of, nor made cuscus and now I’m thinking of all sorts of ways to spin it!
C. Michele says
Let me know what you come up with Marta! I’m so glad you connected with it! You can actually make it with yucca flour instead of corn flour! Im going to be attempting that this weekend!
Paulina Anderson says
My parents are from Brava and my mom has been asking for cuscus for a long time however I have been intimidated to make it! I am going to try this recipe…praying it turns out😊
Tania Vignaud says
This is hands down the best cuscuz recipe I have read. I tried to make some a while back & I failed terribly. I can’t wait to try your version. My daughter loves to eat it with a scoop of ice-scream on the side. I have not had the courage to try it that way, but she swears is the best. I’m still a traditionalist….cafe ku leti.
Crystal says
Not sure how I missed this comment Tania, thank you so much for you kind words! I hope your cuscuz turned out delicious! I would definitely try cuscuz with ice cream!
Helen says
Thank you! Your photo of the binde on the stove brought tears to my eyes. I can almost see my Dad looking over your shoulder… I never had his recipe, but you nailed it! Muito obrigado…
Crystal says
Thank you for sharing that beautiful memory of your father, Helen. I hope you enjoyed! Happy Holidays!
Nereida Djassi says
I want to ask where can I find the binde in the USA?
I really loved your blog made me miss even more food from back home
Eli says
Your recipe is so lovely written, thank you for sharing the recipe and the memories behind it. I so agree on the science and art part of cuzcuz, I know it from when I was in Brazil and also got lucky to taste couscous prepared by a moroccan friend. Knowing now that in cap verde people eat equally delicious but differently prepared cuzcuz somehow made me really happy. 😀 I’ll for sure check out the rest of your blog 🙂
Robert Burrell says
My grandmother always made Cuscuz in an Oatmeal box, over a very large Tea Kettle.I believe she stuffed the bottom of the box wit a dish towel and placed one on top. She sealed the spout with a Potato. When the potato was cooked, so was the cuscuz.That was in 1950s Fox Point.